 快速搭建基于VuePress的简易博客
# 快速搭建基于VuePress的简易博客
本文内容包含两部分:
- 搭建一个基于VuePress的静态页面网站
- 将页面发布到Github Pages和Gitee Pages
# 关于VuePress
VuePress (opens new window)是一个Vue驱动的以Markdown为中心的静态网站生成器。核心是通过编写Markdown文档的方式创建网页,可以让使用者更容易专注于内容本身而非站点的构建上,因此非常适合用来编写博客或是项目文档。当前站点就是基于VuePress发布在Github Pages
# 项目搭建
项目的搭建方式有很多种,最终的目录结构也有所不同,在这里笔者主要是基于官网的方式,再结合上一些额外的配置。
主要步骤:建立空白Node项目 --> 加入VuePress依赖 -->写入第一篇文档
# 建立Node项目
创建一个新的目录
mkdir vue-press-demo && cd vue-press-demo
初始化node项目
yarn init # npm init
# 加入VuePress依赖
导入VuePress的依赖(官方建议使用开发依赖而非全局依赖)
yarn add -D vuepress # npm install -D vuepress
在package.json中加入一些scripts
{
  "scripts": {
    "docs:dev": "vuepress dev docs",
    "docs:build": "vuepress build docs"
  }
}
# 写入第一篇文档
建立 docs目录,后续的所有文档都将存放在此目录下
mkdir docs
在docs目录下创建README.md并写入内容(推荐使用Typora作为文档编辑器)
echo '# Hello VuePress' > docs/README.md
此时我们的目录结构应该是这样的
.
├── docs
│   ├── README.md
└── package.json
启动预览
yarn docs:dev # npm run docs:dev
访问 127.0.0.1:8080
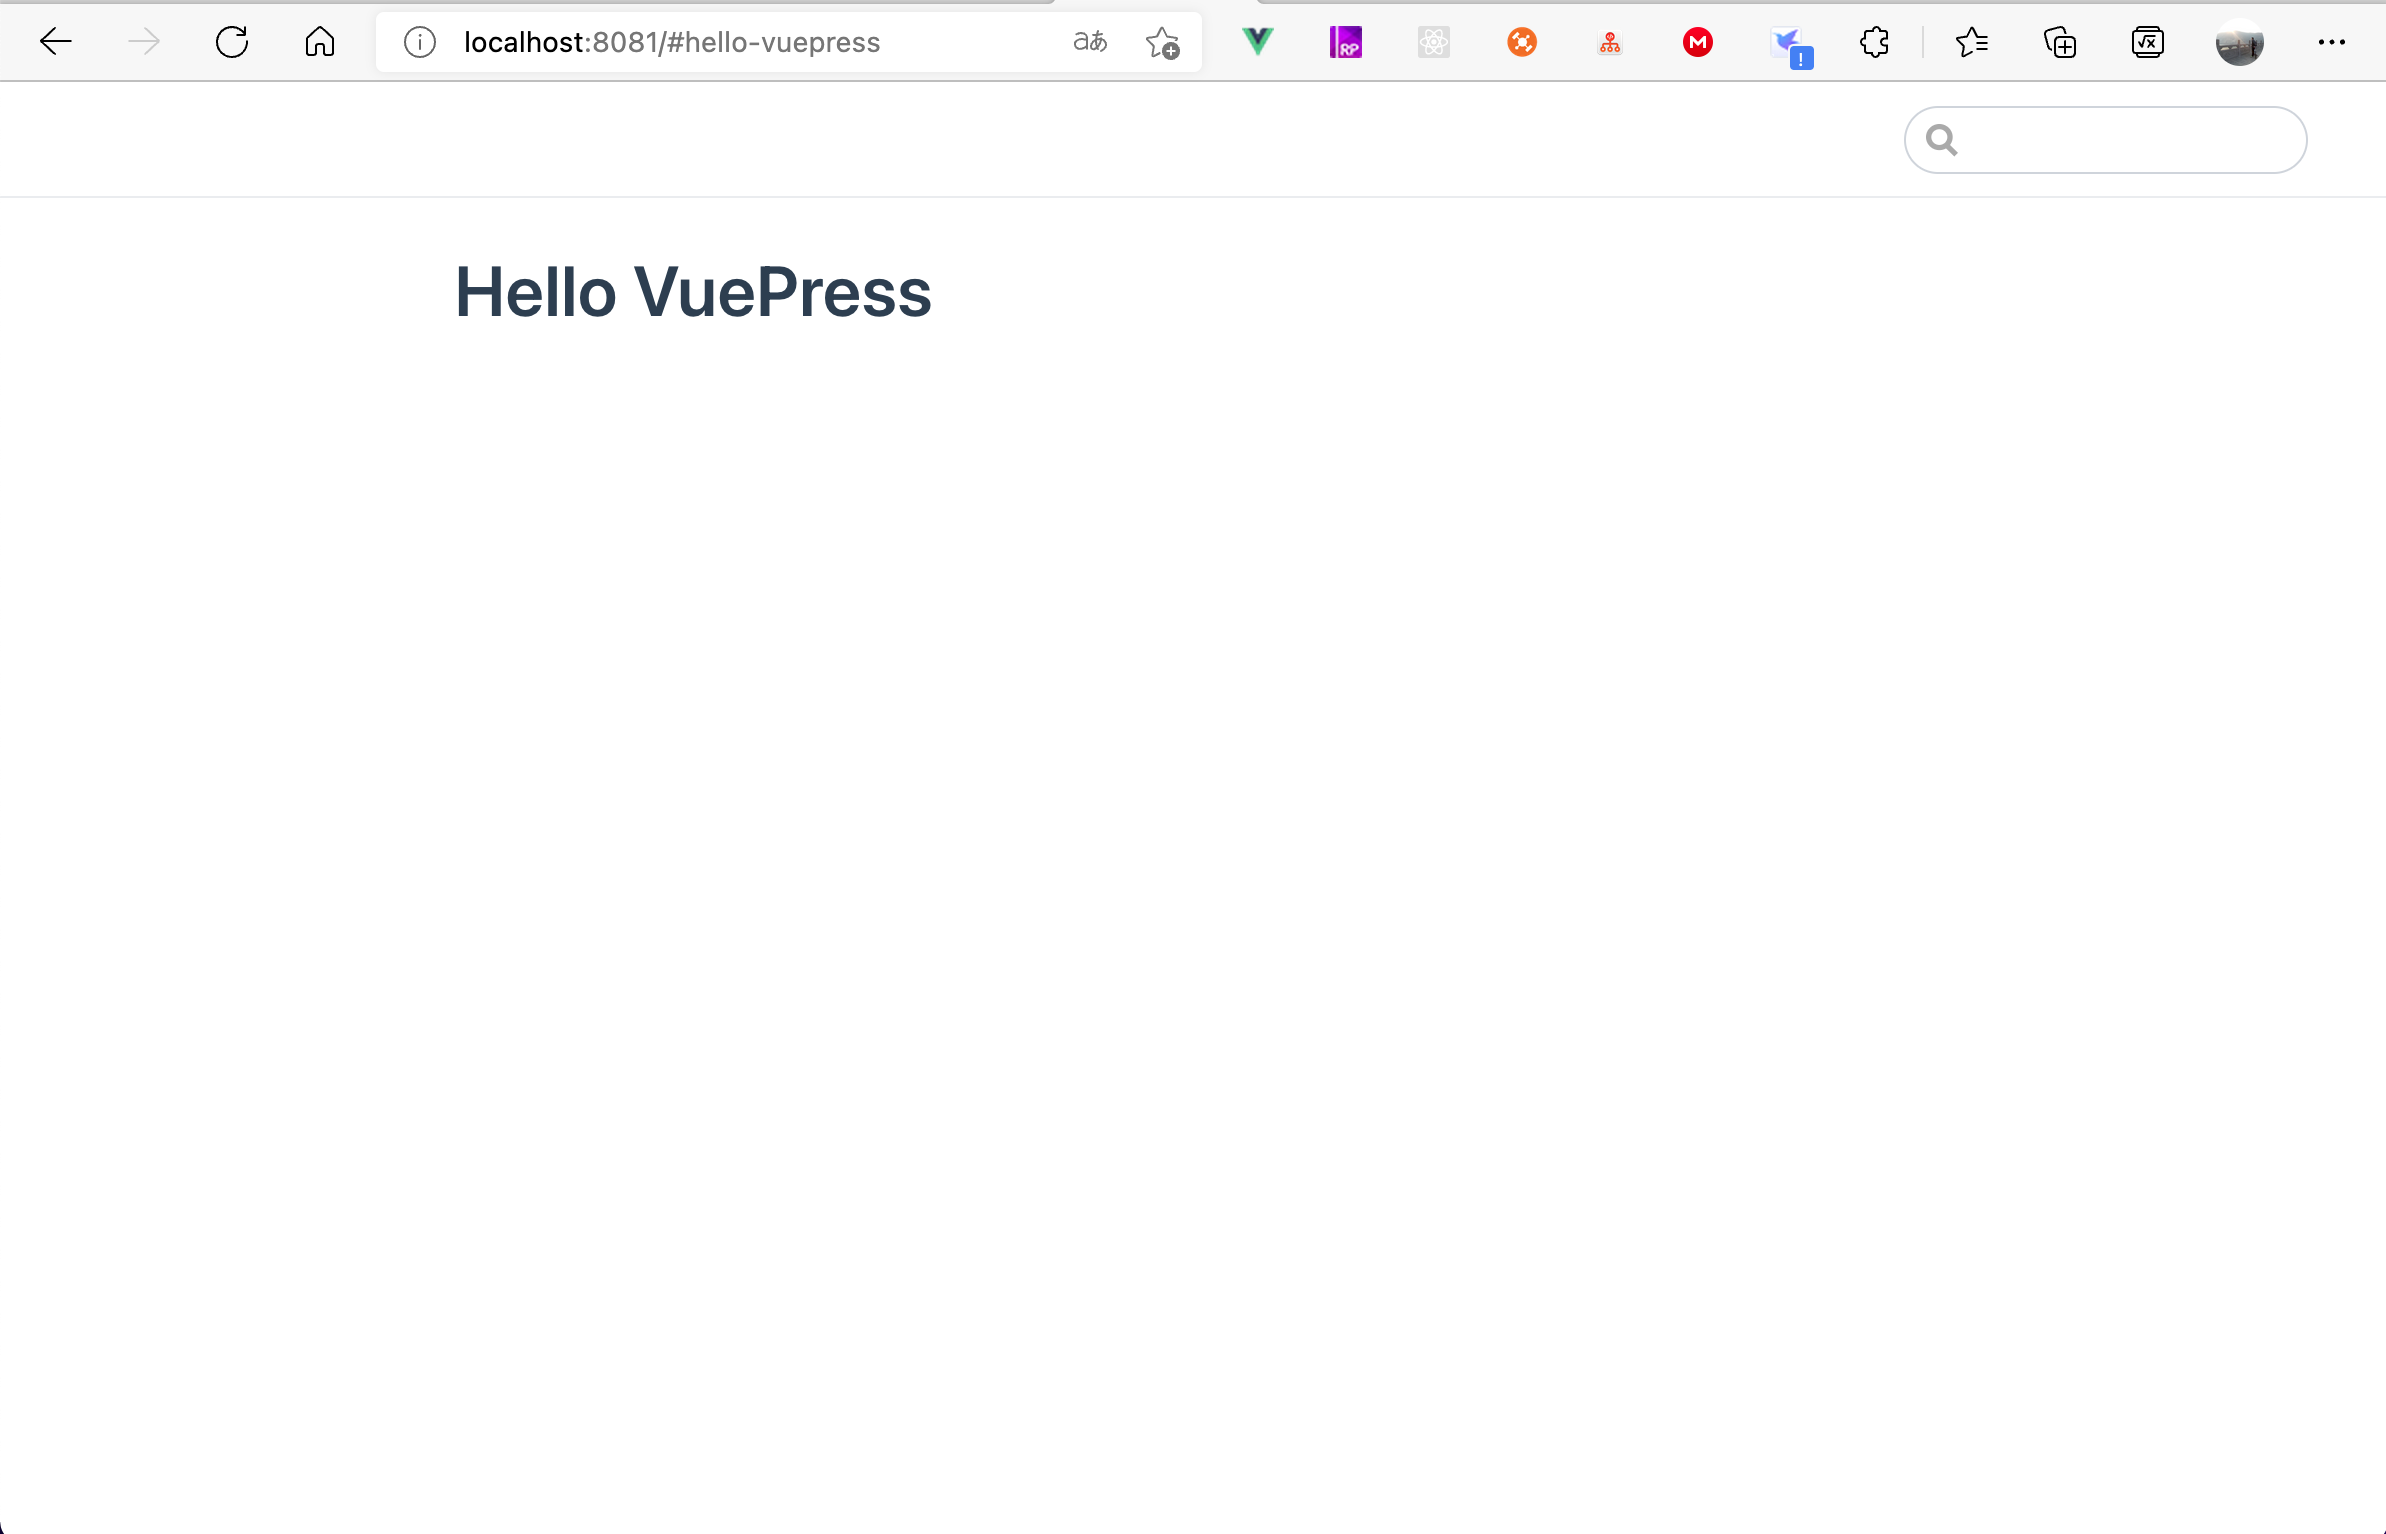
到这里就已经完成了项目的基本配置,更多配置可以参考快速上手 | VuePress (vuejs.org) (opens new window)。
# 附加配置
官方的模版更倾向于用来编写项目文档,并不太适合用于创建个人博客,所以我们还需要针对博客进行一些配置,在这里我引入了主题(vuepress-theme-vdoing (opens new window)),以及一些插件来丰富功能。
# 引入主题及插件依赖
yarn add -D vuepress-theme-vdoing dayjs vuepress-plugin-one-click-copy vuepress-plugin-thirdparty-search vuepress-plugin-zooming
# vuepress-theme-vdoing 主题
# dayjs 时间日期工具库 https://dayjs.fenxianglu.cn/
# vuepress-plugin-one-click-copy 代码块点击复制插件
# vuepress-plugin-thirdparty-search 第三方搜索插件
# vuepress-plugin-zooming 图片缩放插件
# 新建项目配置文件并加入主题配置
首先需要在docs目录下建立.vuepress目录
接下来所有的项目相关配置以及静态资源都将在这个目录下存放
mkdir docs/.vuepress
在.vuepress目录下新建config.js,并加入以下内容
module.exports = {
    theme: 'vdoing', // 使用npm包主题
    title: '站点名称',
    markdown: {
        toc: {
            includeLevel: [2, 3, 4]
        },
        lineNumber: true // 代码块行号
    },
    themeConfig: {
      	// 导航栏配置
        nav: [
            { text: '首页', link: '/' }, {
                text: '索引',
                link: '/archives/',
                items: [
                    { text: '分类', link: '/categories/' },
                    { text: '标签', link: '/tags/' },
                    { text: '归档', link: '/archives/' },
                ],
            },
            { text: "GitHub", link: 'https://github.com/diaz-zeng', target: '_blank' },
            { text: "Issues", link: 'https://github.com/diaz-zeng/diaz-zeng.github.io/issues', target: '_blank' },

        ],
        // sidebarDepth: 2, // 侧边栏显示深度,默认1,最大2(显示到h3标题)
        searchMaxSuggestions: 10, // 搜索结果显示最大数
        lastUpdated: '上次更新', // 开启更新时间,并配置前缀文字   string | boolean (取值为git提交时间)
        docsDir: 'docs', // 编辑的文件夹
        sidebar: 'structuring', // 侧边栏  'structuring' | { mode: 'structuring', collapsable: Boolean} | 'auto' | 自定义    温馨提示:目录页数据依赖于结构化的侧边栏数据,如果你不设置为'structuring',将无法使用目录页
        author: {
            // 文章默认的作者信息,可在md文件中单独配置此信息 String | {name: String, link: String}
            name: '你的名字', // 必需
            link: '你的github或者其他个人主页链接', // 可选的
        },
        social: {
            // 社交图标,显示于博主信息栏和页脚栏
            // iconfontCssFile: '//at.alicdn.com/t/font_1678482_u4nrnp8xp6g.css', // 可选,阿里图标库在线css文件地址,对于主题没有的图标可自由添加
            icons: [
                {
                    iconClass: 'icon-github',
                    title: 'GitHub',
                    link: 'https://github.com/diaz-zeng', // 替换成你的github地址或者删除整个icons字段
                },
            ],
        },
        // 页脚信息
        footer: {
            createYear: 2021, // 博客创建年份
            copyrightInfo:
                '你的名字 | <a href="#" target="_blank">MIT License</a>', // 博客版权信息,支持a标签
        },
    },
    head: [
        [
            'meta',
            {
                name: 'keywords',
                content: '前端博客,个人技术博客,前端,前端开发,前端框架,web前端,前端面试题,技术文档,学习,面试,JavaScript,js,ES6,TypeScript,vue,python,css3,html5,Node,git,github,markdown',
            },
        ],
        ['meta', { name: 'theme-color', content: '#11a8cd' }], // 移动浏览器主题颜色

    ],
    plugins: [
        // 可以添加第三方搜索链接的搜索框(原官方搜索框的参数仍可用)
        [
            'thirdparty-search',
            {
                thirdparty: [
                    // 可选,默认 []
                    {
                        title: '在MDN中搜索',
                        frontUrl: 'https://developer.mozilla.org/zh-CN/search?q=', // 搜索链接的前面部分
                        behindUrl: '', // 搜索链接的后面部分,可选,默认 ''
                    },
                    {
                        title: '在Runoob中搜索',
                        frontUrl: 'https://www.runoob.com/?s=',
                    },
                    {
                        title: '在Vue API中搜索',
                        frontUrl: 'https://cn.vuejs.org/v2/api/#',
                    },
                    {
                        title: '在Bing中搜索',
                        frontUrl: 'https://cn.bing.com/search?q=',
                    },
                    {
                        title: '通过百度搜索',
                        frontUrl: 'https://www.baidu.com/s?wd=',
                    },
                ],
            },
        ],
        [
            'one-click-copy',
            {
                // 代码块复制按钮
                copySelector: ['div[class*="language-"] pre', 'div[class*="aside-code"] aside'], // String or Array
                copyMessage: '复制成功', // default is 'Copy successfully and then paste it for use.'
                duration: 1000, // prompt message display time.
                showInMobile: false, // whether to display on the mobile side, default: false.
            },
        ],
        [
            'vuepress-plugin-zooming', // 放大图片
            {
                selector: '.theme-vdoing-content img:not(.no-zoom)', // 排除class是no-zoom的图片
                options: {
                    bgColor: 'rgba(0,0,0,0.6)',
                },
            },
        ],
        [
            '@vuepress/last-updated', // "上次更新"时间格式
            {
                transformer: (timestamp, lang) => {
        					const dayjs = require('dayjs') // https://day.js.org/
        					const utc = require('dayjs/plugin/utc')
                  /*
                   强制使用UTC时间并设置偏移量以固定到东八区
                   否则将会使用服务器本地时间,比如在GitHub Pages上部署时就会使用UTC时
                   偏移量以分钟为单位
                   */
       				 		dayjs.extend(utc)
        					return dayjs(timestamp).utcOffset(480).format('YYYY/MM/DD, HH:mm:ss');
                },
            },
        ],
    ]
    ,
}
保存配置后再重启预览
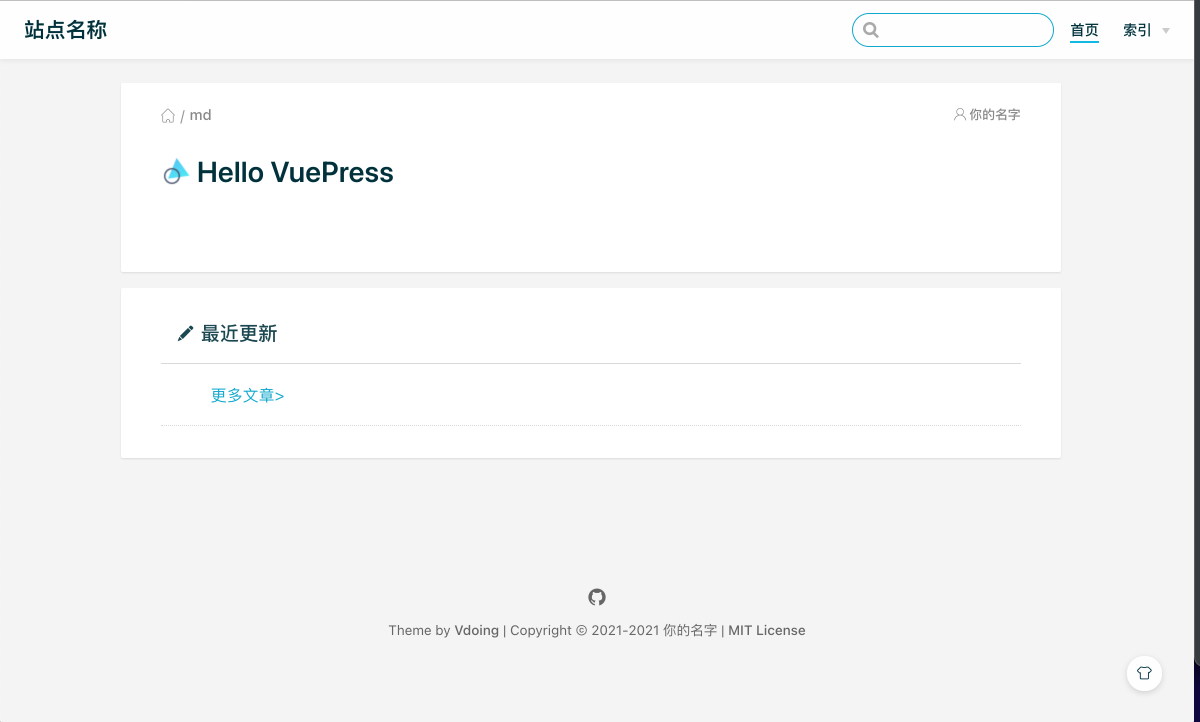
此时就更像是博客的样子了🤣
# 部署与自动更新
作为一个资深的白嫖党,让我花钱租服务器是不可能的,正好GitHub和Gitee都有相应的Pages服务用来托管静态页面,对于一个博客来说这就够用了。
# GitHub Pages
首先要明确项目是要部署在<username>.github.io(作为账户的pages)下还是<username>.github.io/<repo>(作为某个项目的pages)下,如果是作为某个项目的pages进行部署则需要在docs/.vuepress/config.js中修改base字段(Gitee同理)。配置 | VuePress (vuejs.org) (opens new window)
module.exports = {
  base:'/你的项目名称/'
}
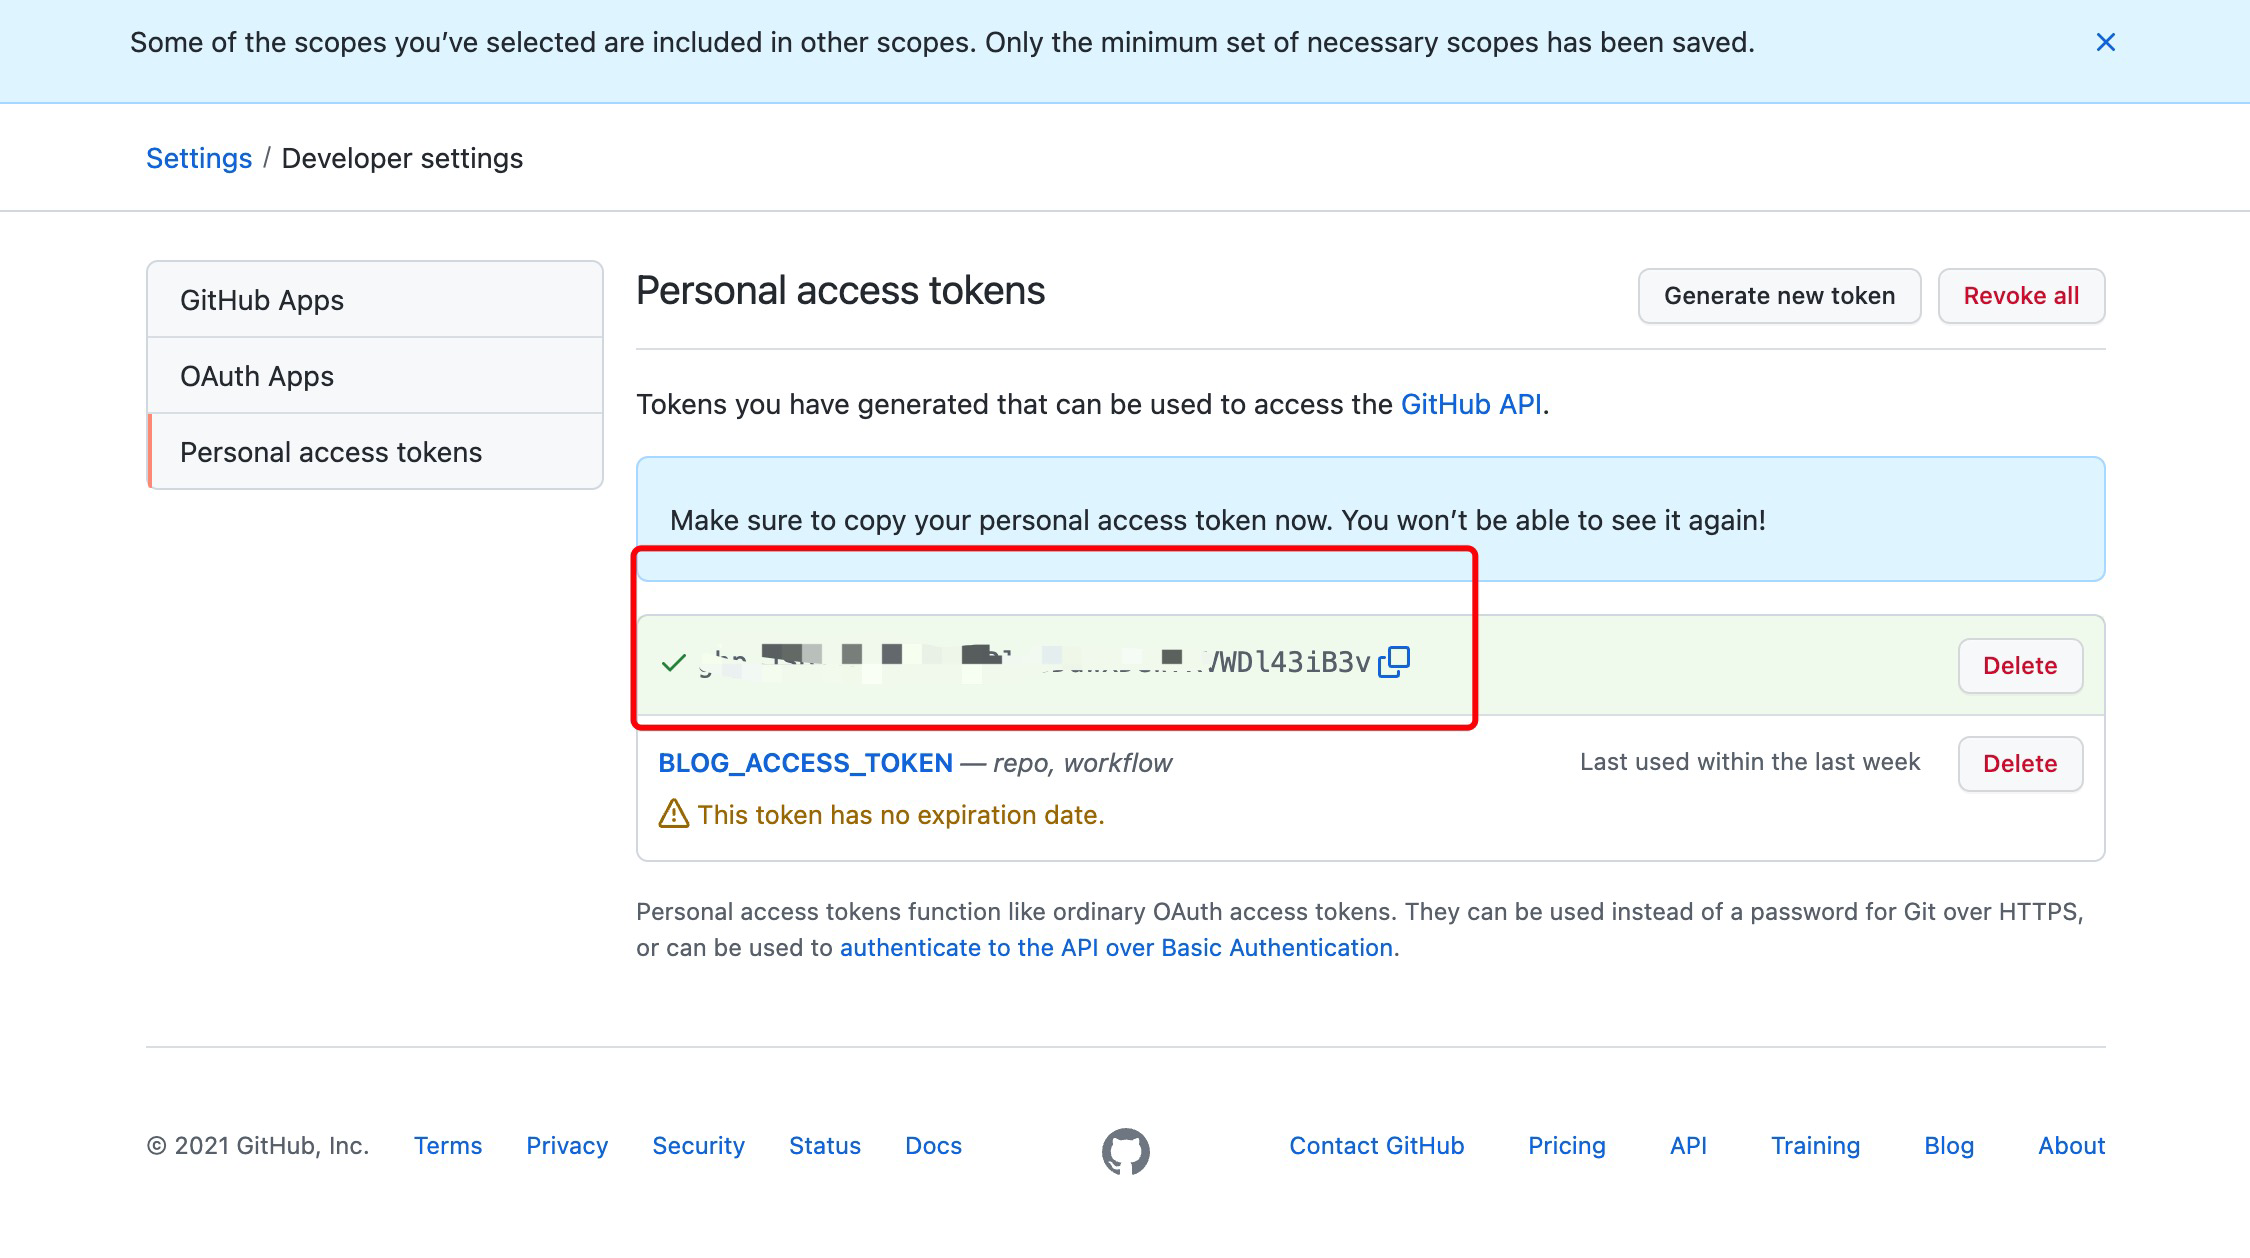
# 访问Personal Access Tokens (github.com) (opens new window)创建一个新的Personal Access Token
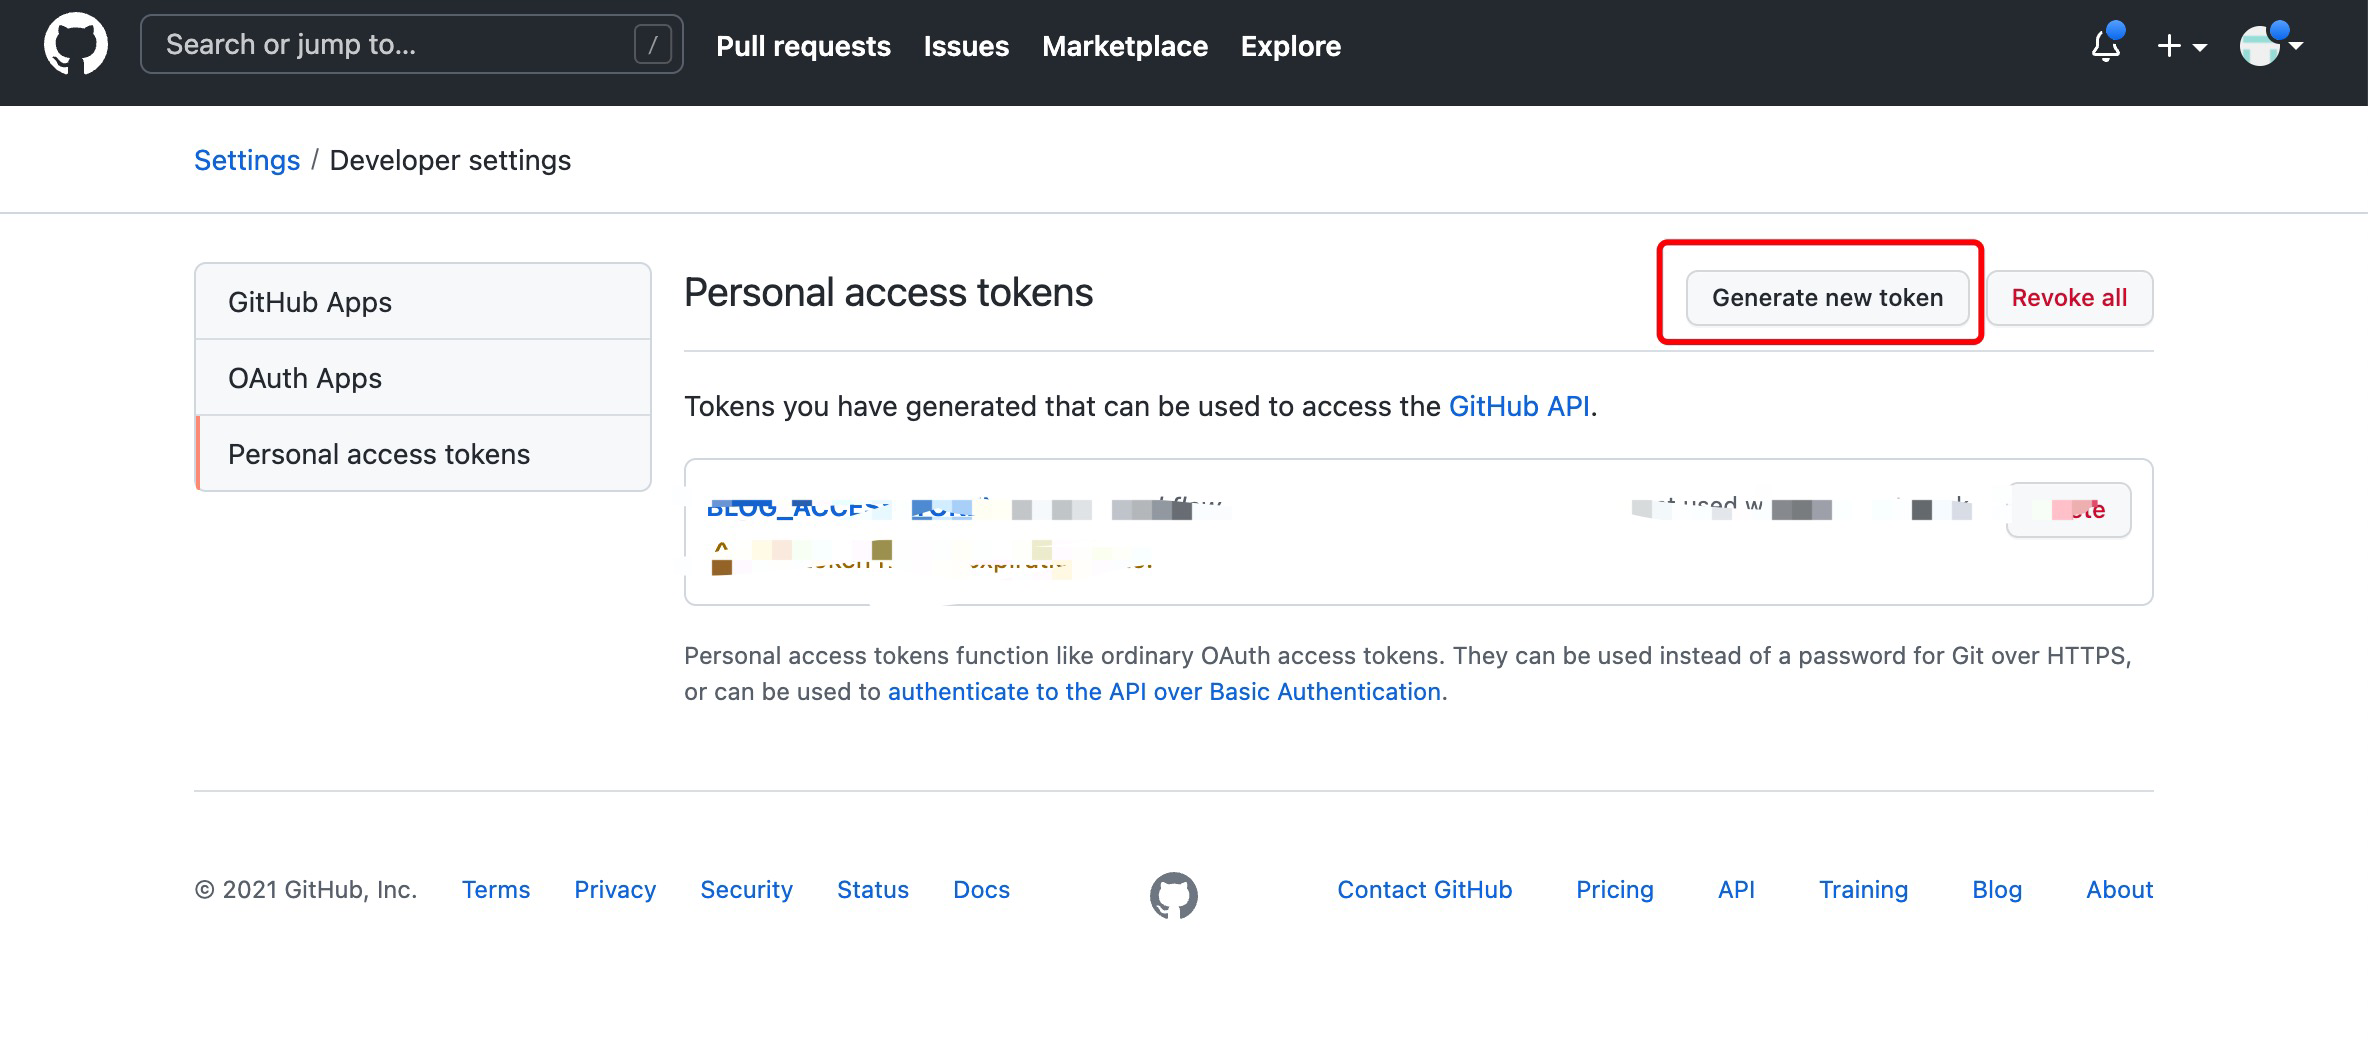
因为我们只需要推送代码,所以我们只需要勾选repo权限即可,过期时间为了方便我就选择了不过期,也可以根据需求自行定义
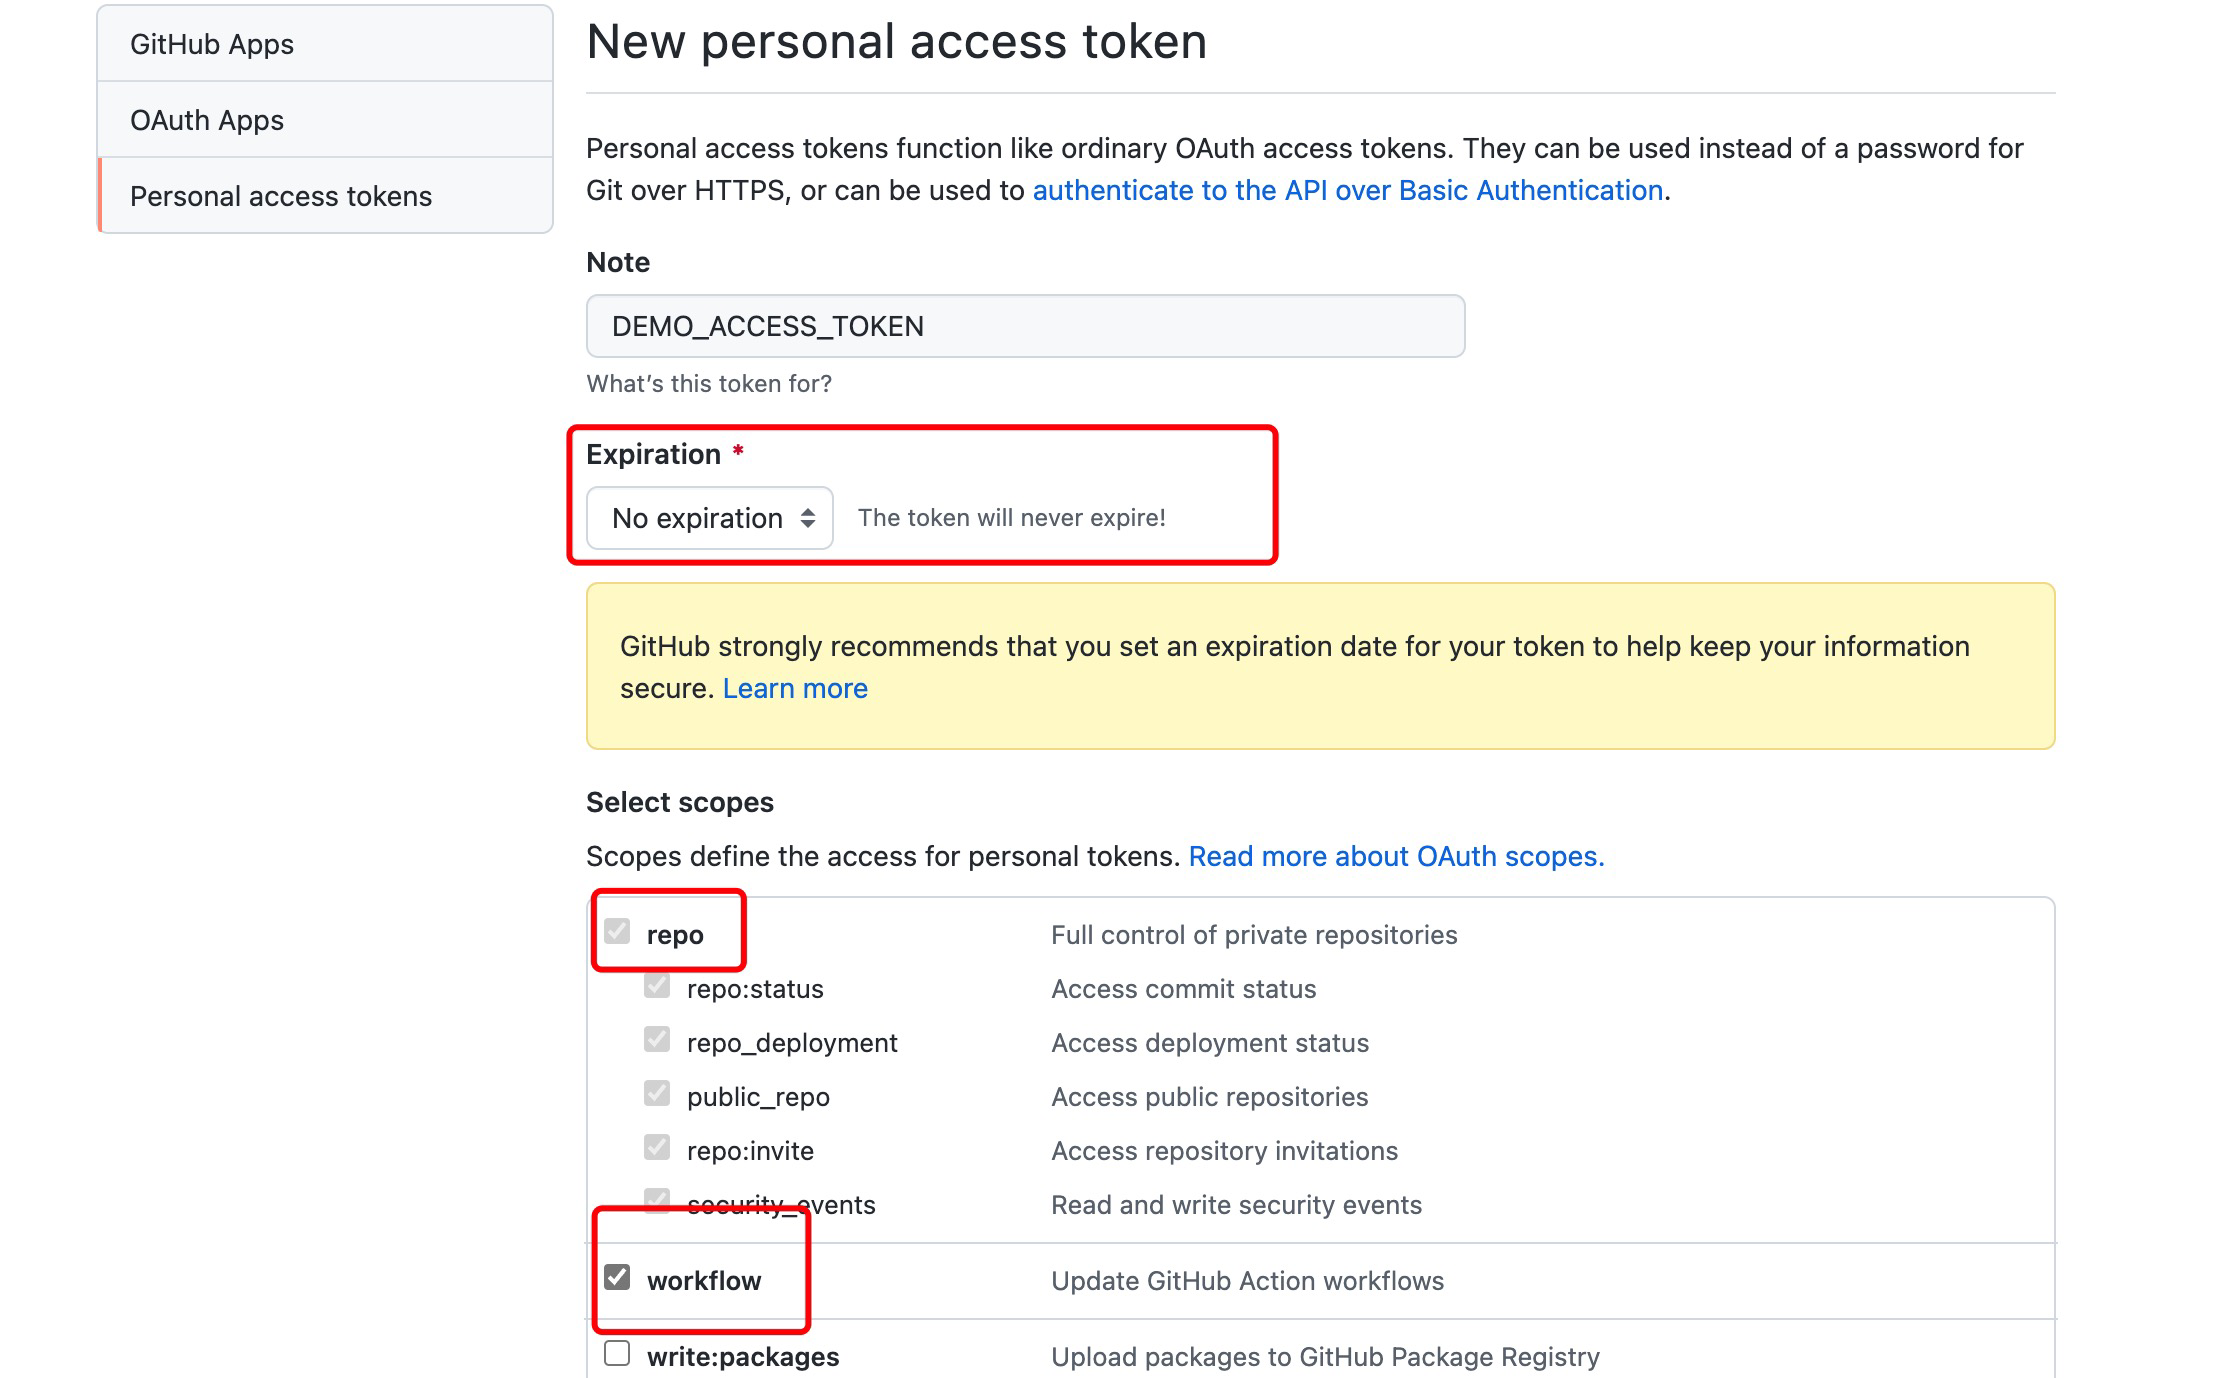
将token值妥善保存,之后将无法再看到它
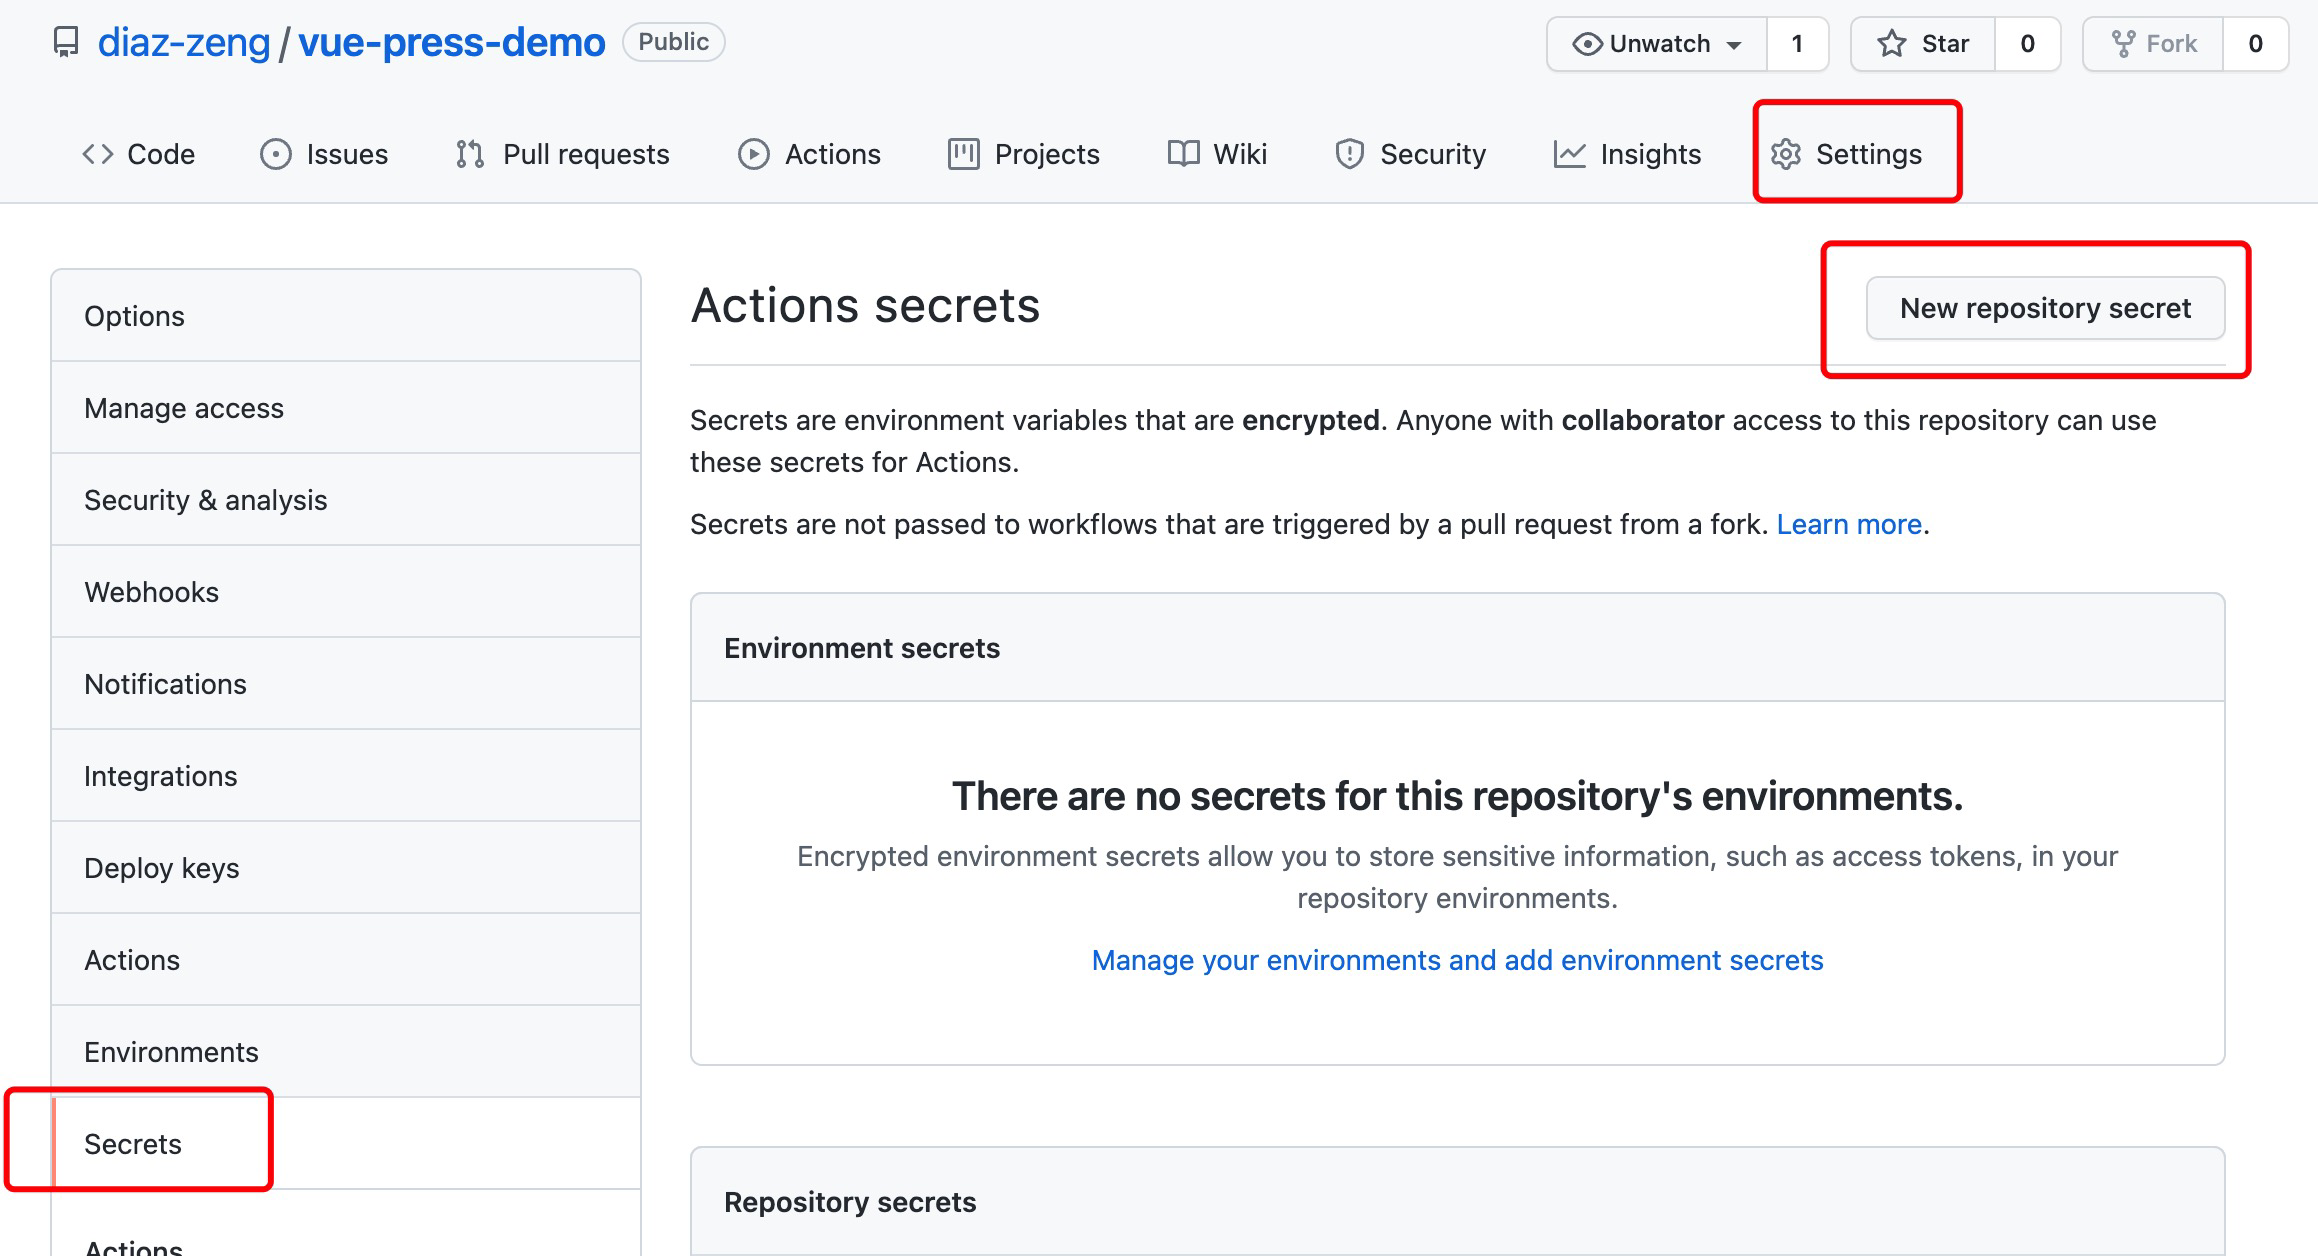
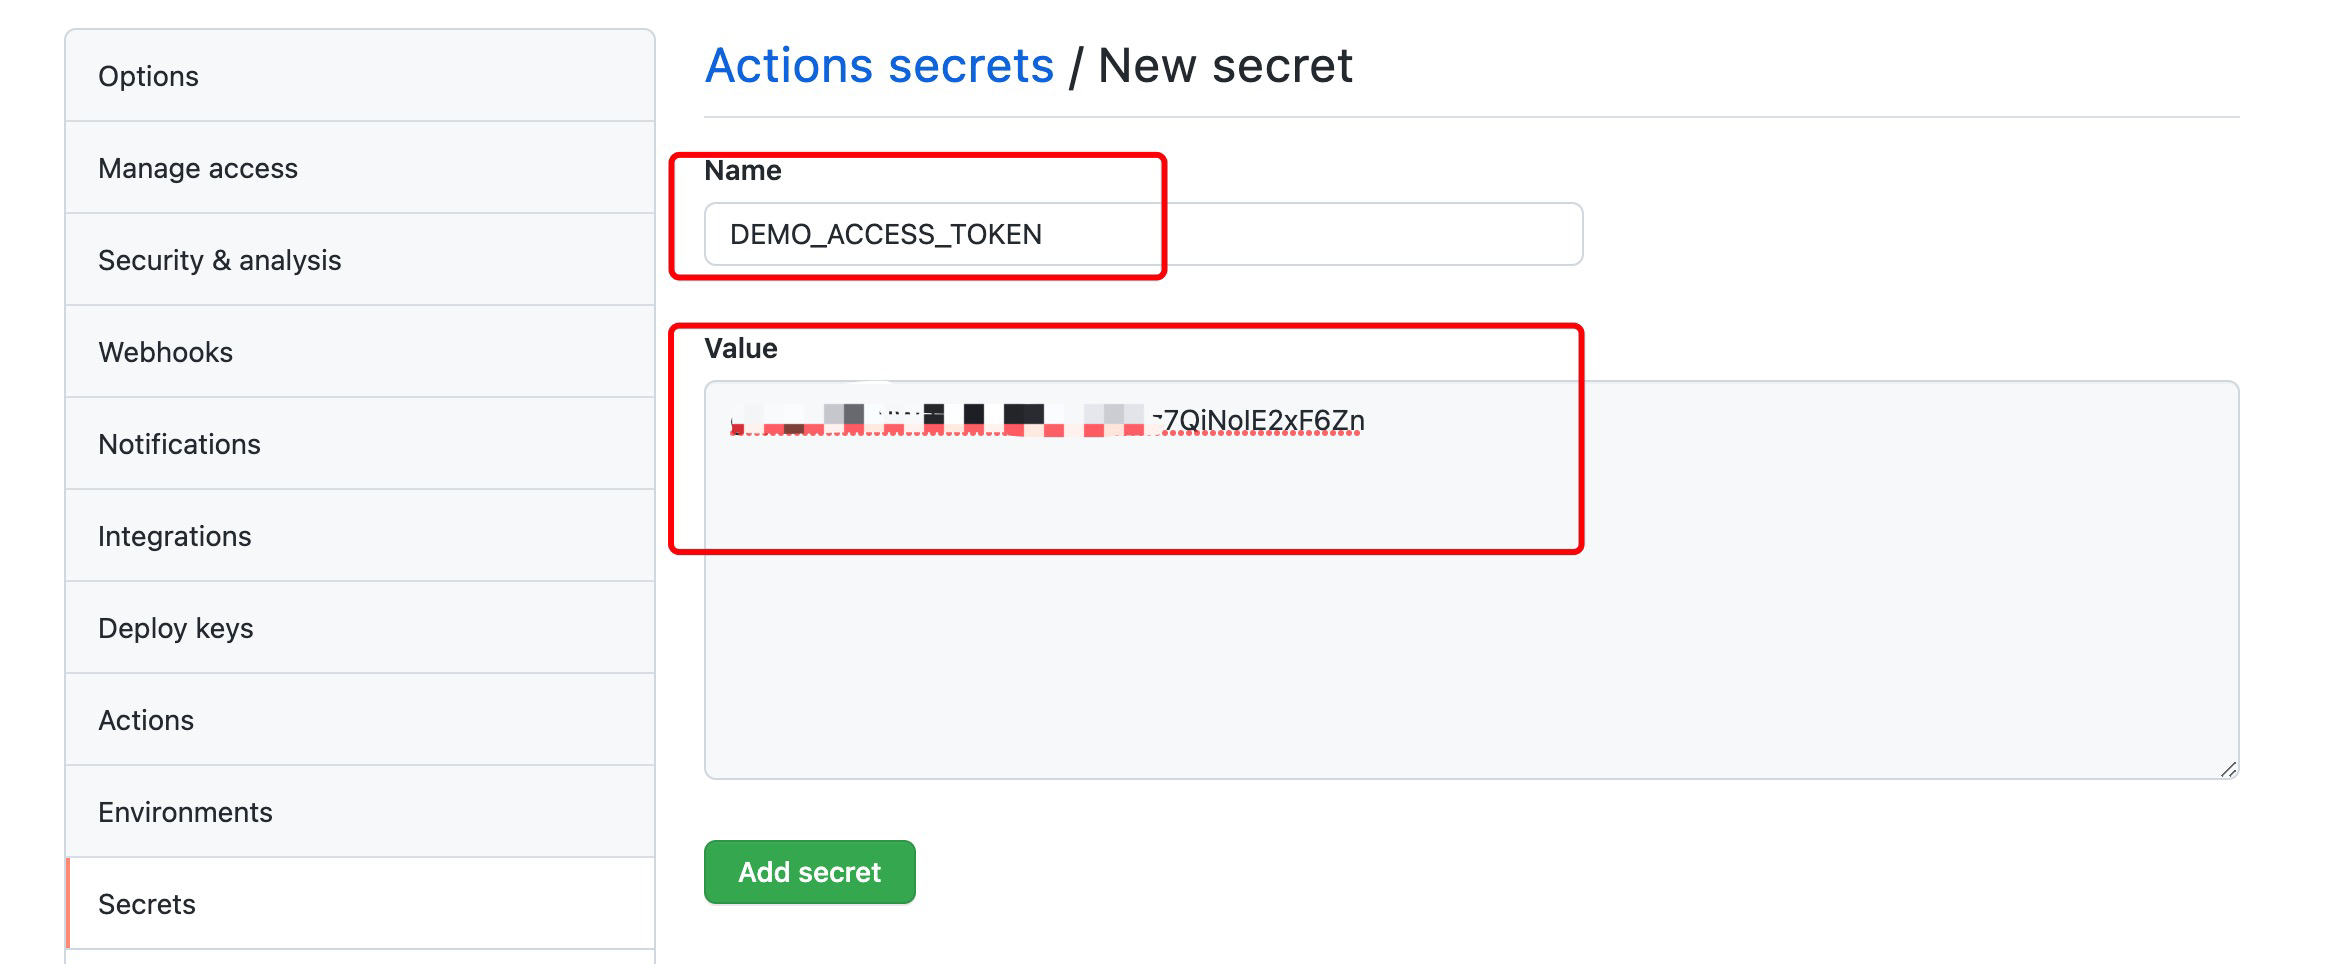
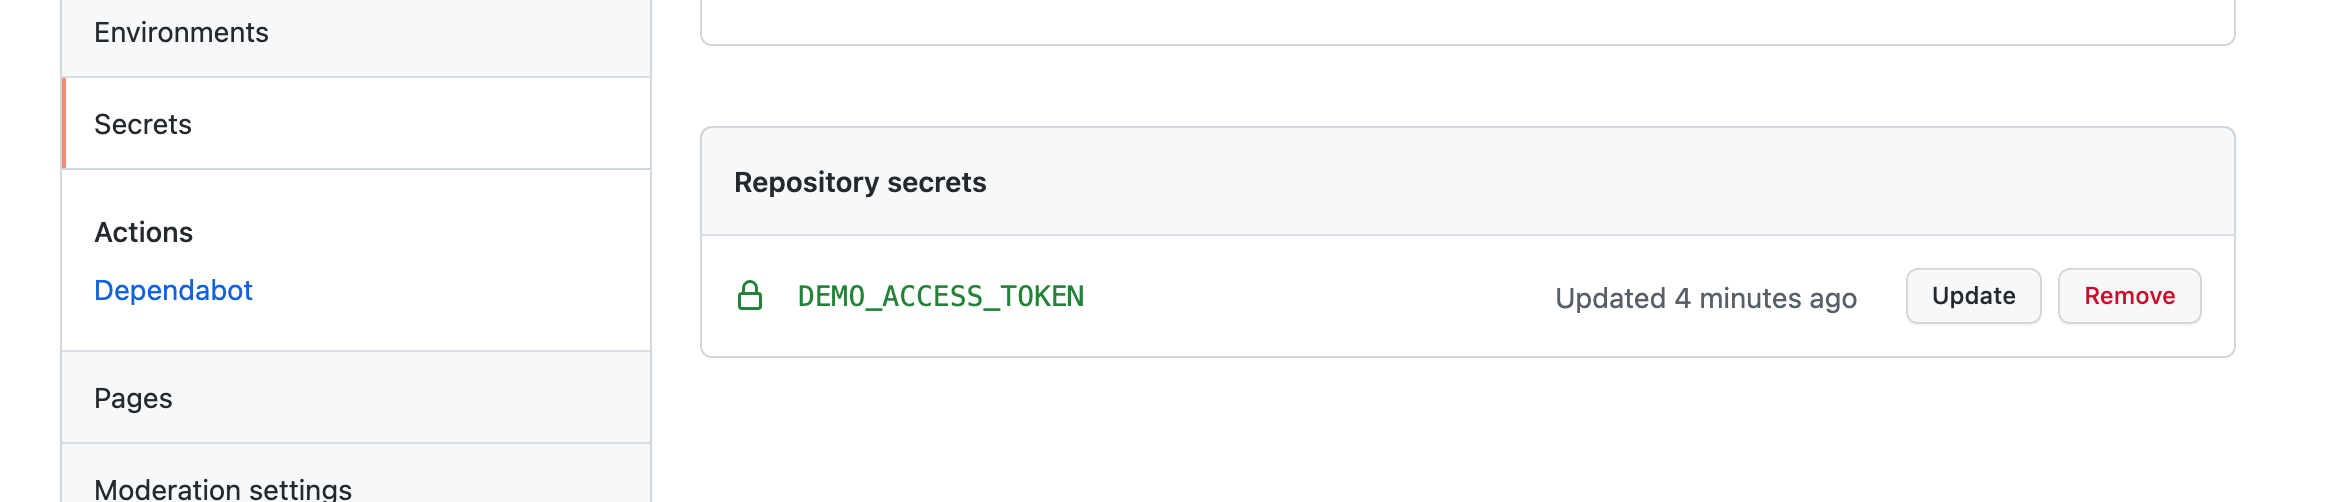
# 保存令牌到Github代码库的Settings
打开repo的settings将token加入进去
# 创建.github/workflows目录及配置文件
mkdir .github && mkdir .github/workflows
在.github/workflows下新建deploy-site.yml并写入:
name: Deploy Site
# 触发条件:当master分支有更改时
on:
  push:
    branches: [ master ]
  pull_request:
    branches: [ master ]

jobs:
  # 部署到GitHub Pages
  build-and-deploy:
    runs-on: ubuntu-latest
    name: "build and deploy"

    steps:
    - name: Checkout
      uses: actions/checkout@v2

    # 安装依赖并打包
    - name: Install and build
      run: yarn install && yarn docs:build

    # 部署构建物到指定分支
    - name: Deploy 🚀
      uses: JamesIves/github-pages-deploy-action@4.1.5
      with:
        branch: gh-pages
        folder: ./docs/.vuepress/dist
        token: ${{secrets.DEMO_ACCESS_TOKEN}} # Personal Access Token
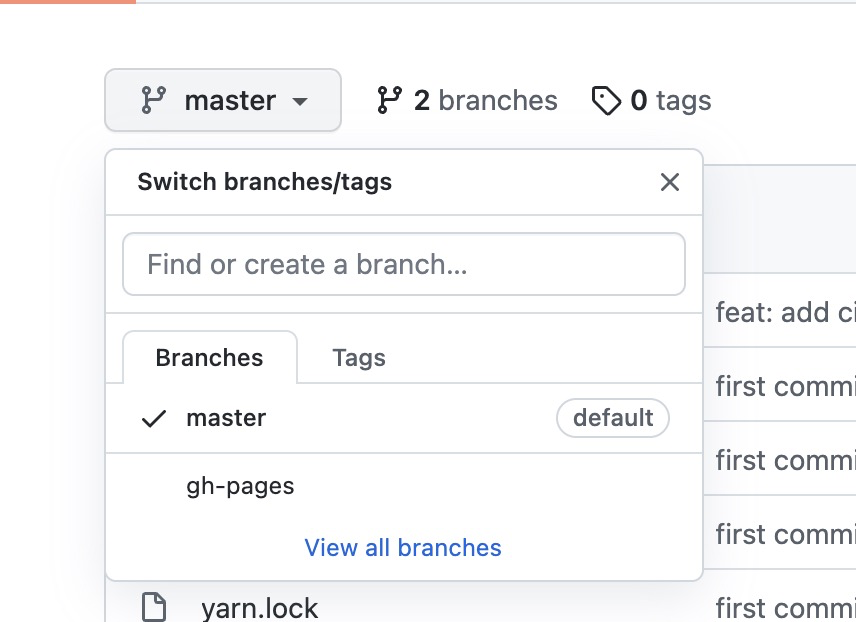
# 提交代码代码到GitHub以触发构建
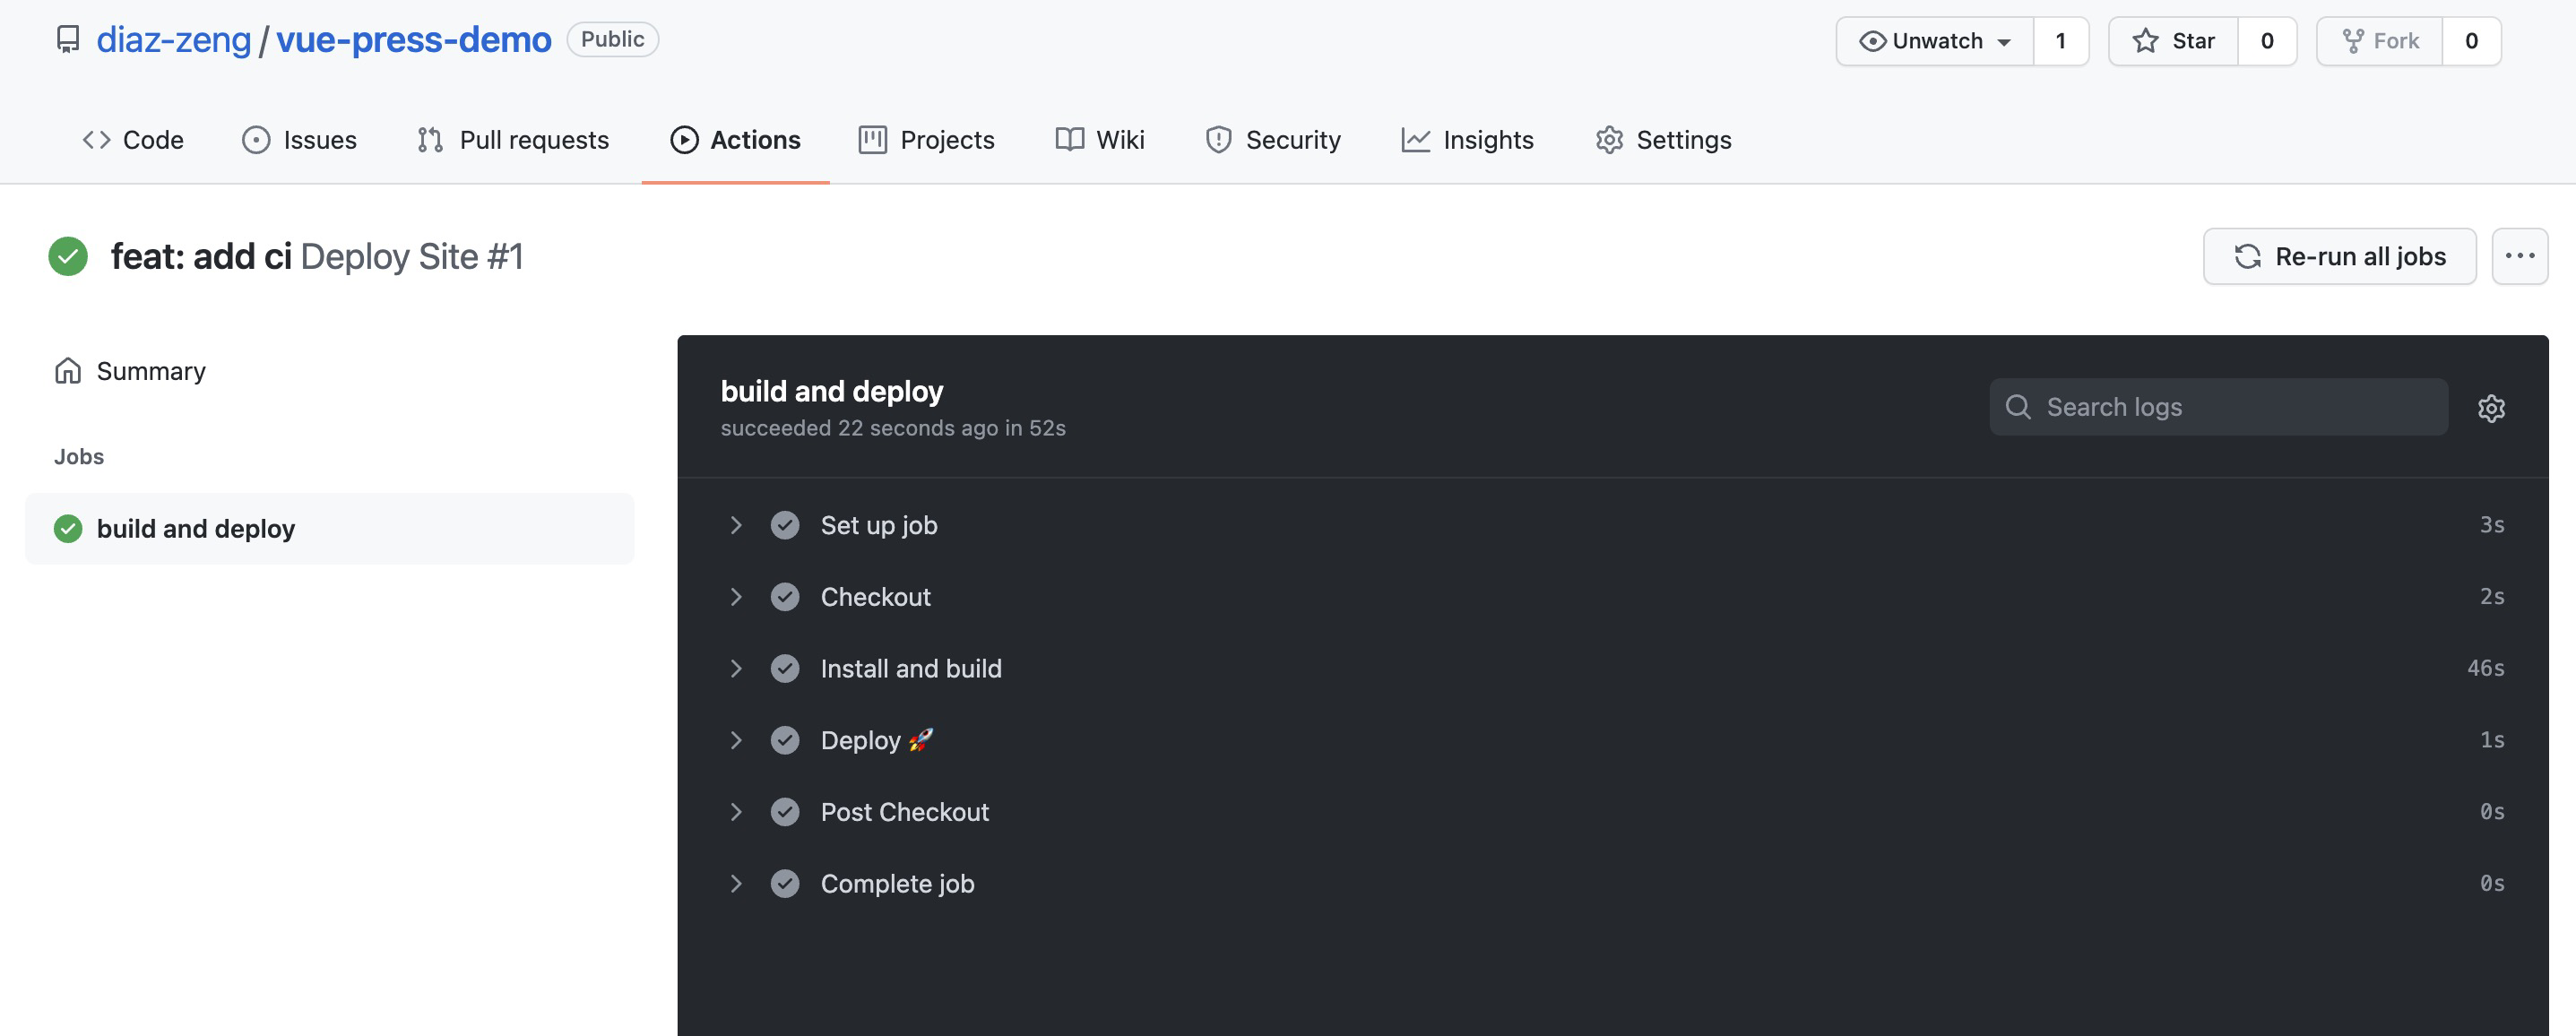
此时在远端新生成了一个gh-pages分支
# 修改Github代码库的设置以启用Pages
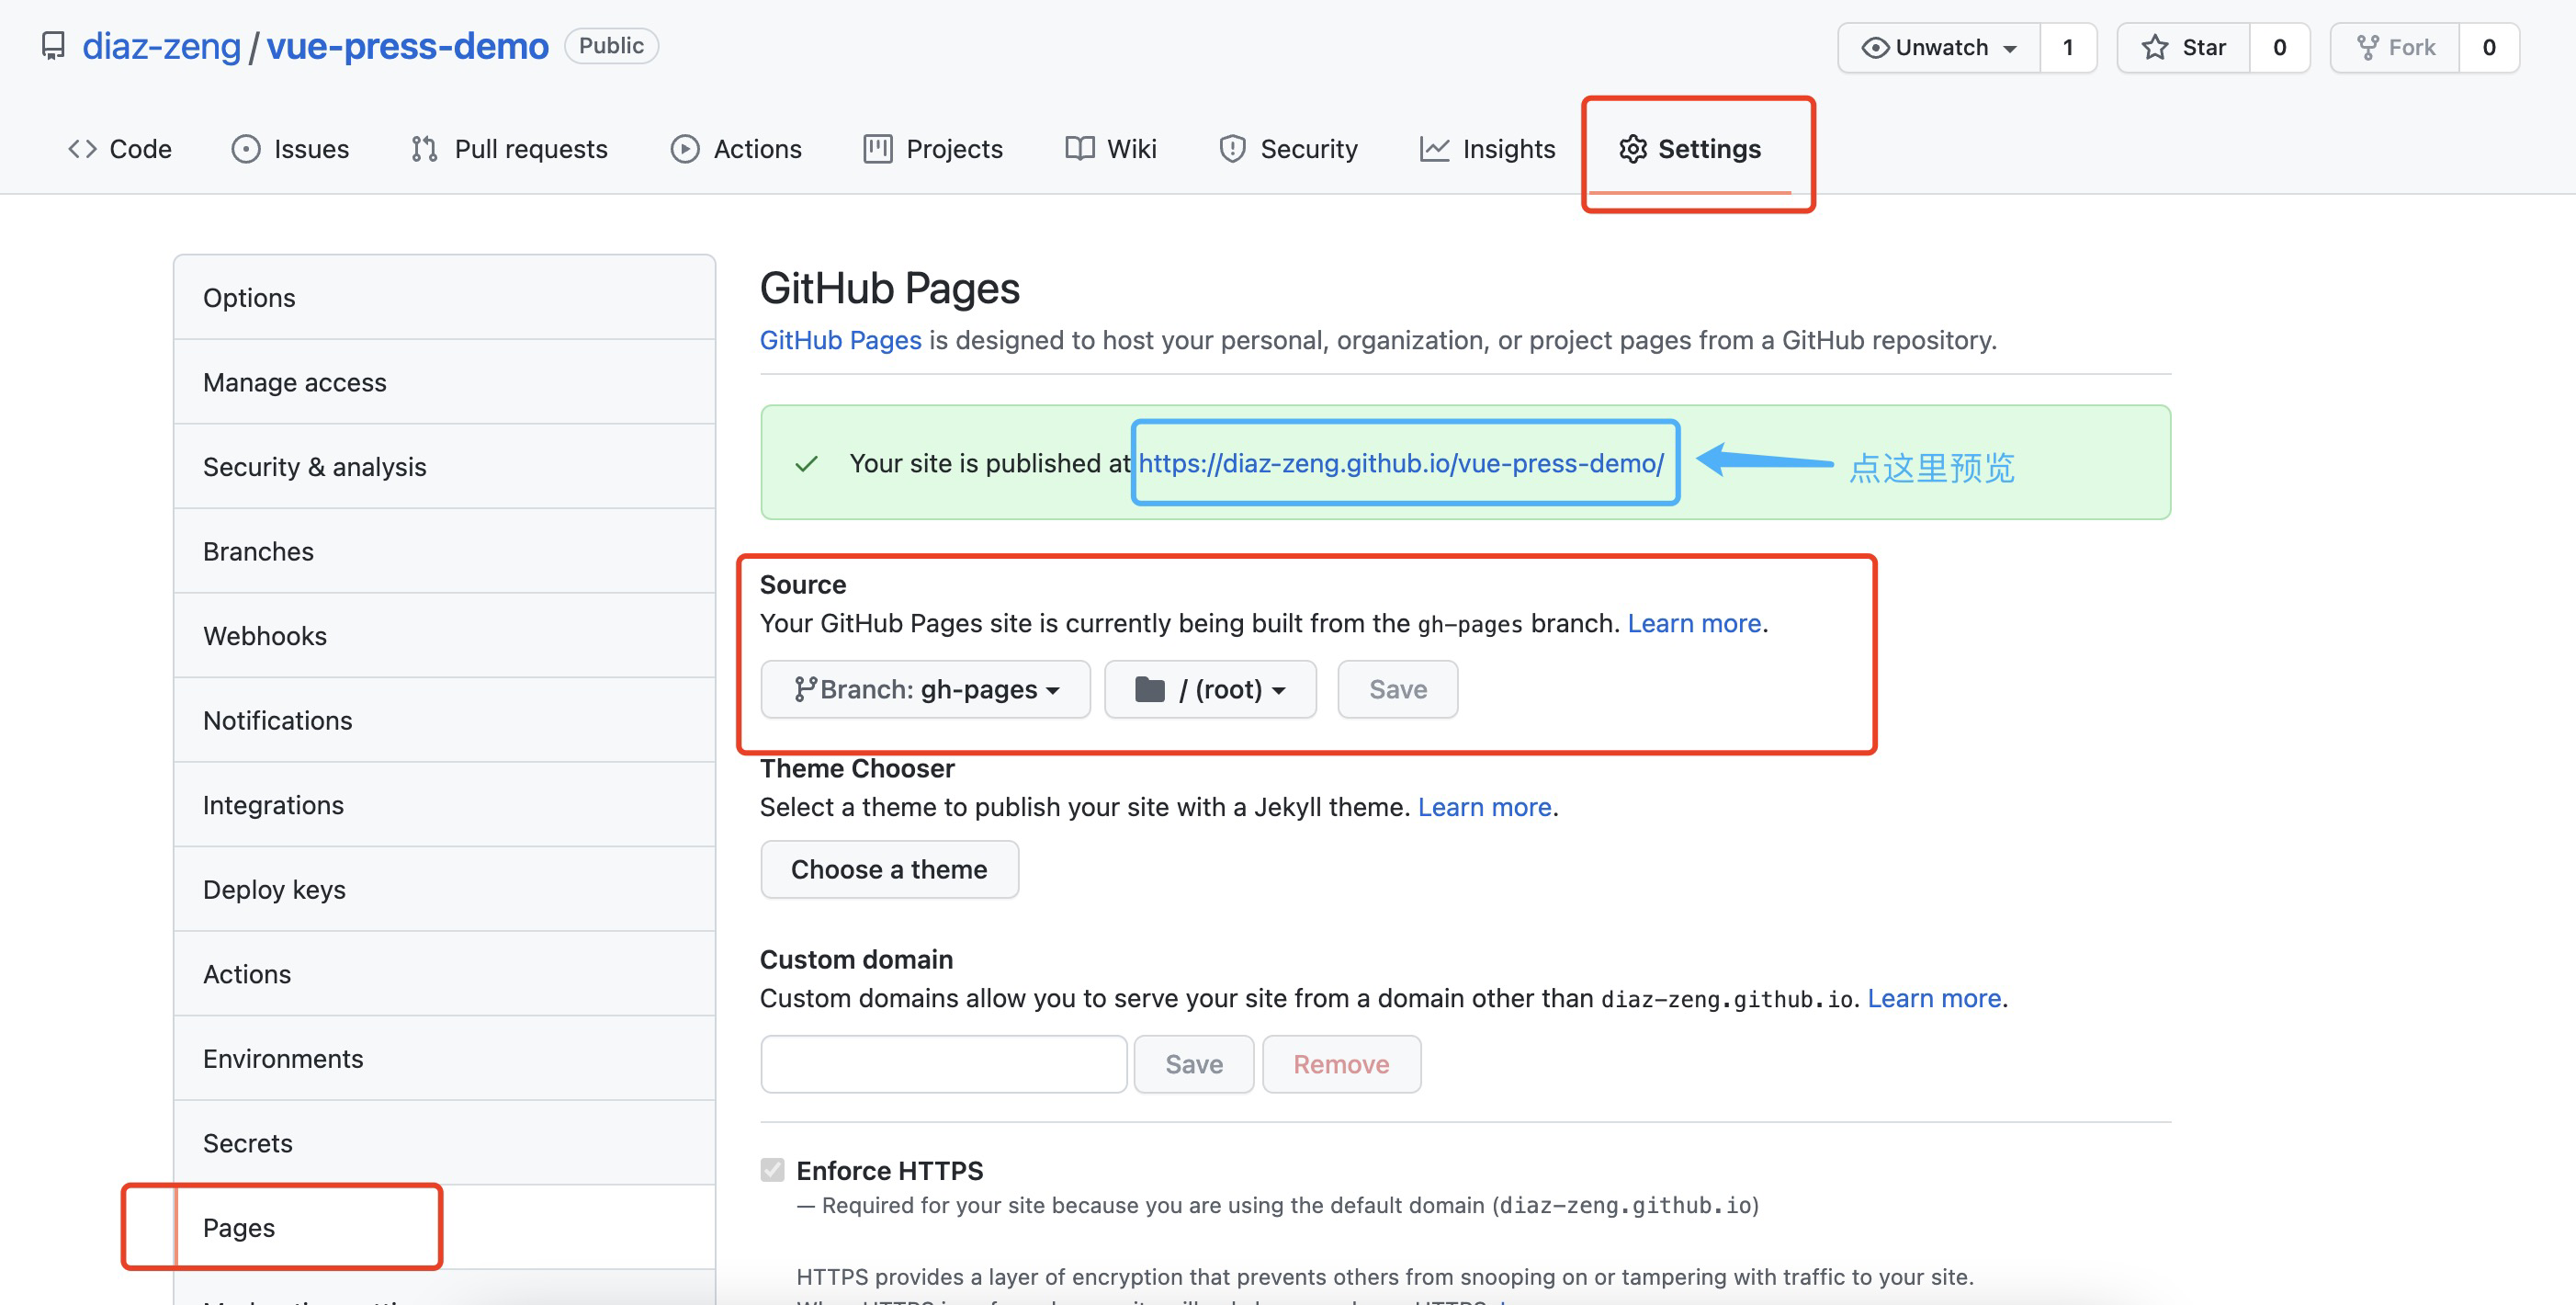
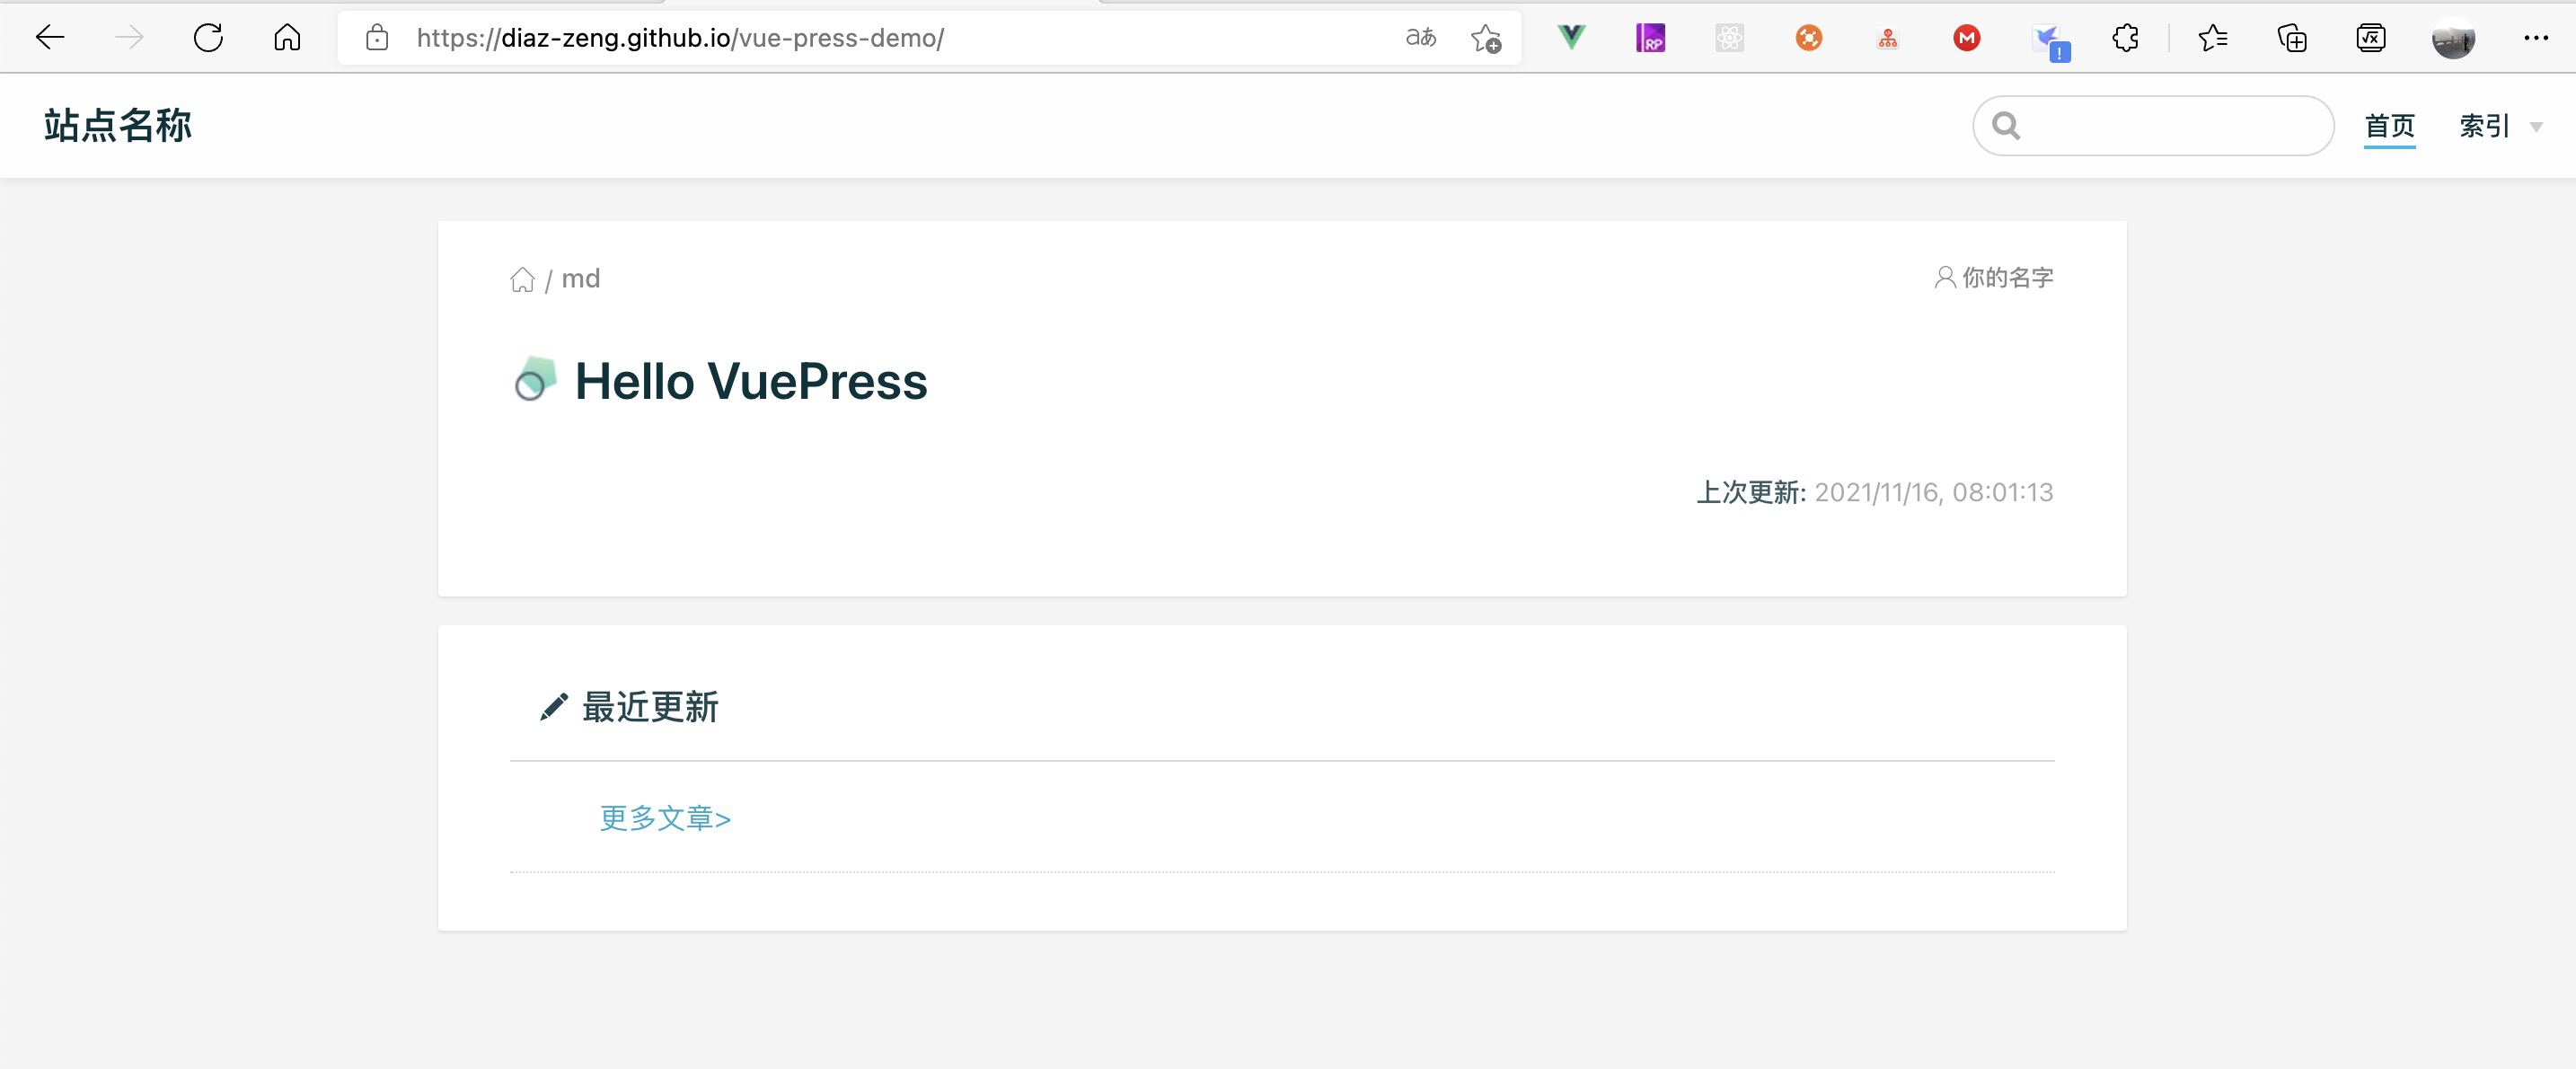
# 访问预览
# Gitee Pages
Gitee Pages 其实和Github Pages是非常类似的,之所以要加入Gitee的配置是因为在国内因为众所周知的原因GitHub的访问情况并不是很理想,所以相应的在Gitee做一个镜像来方便访问。但是,有一个很严重的问题,虽然Gitee Pages服务本身不要钱,但是Pages的自动刷新和流水线服务要钱。。。这对于我来说明显是不能接受的😂(土豪请忽略)。
所以,我们还是用GitHub的服务来帮助我们部署Gitee Pages(GitHub YYDS!!!👍🏻)
# 创建Gitee的Access Token
我们只需要项目的访问权限即可,不需要勾选其他的权限(和GitHub差不多,这一部分加上很大程度是为了让这篇文章看起来很长)。
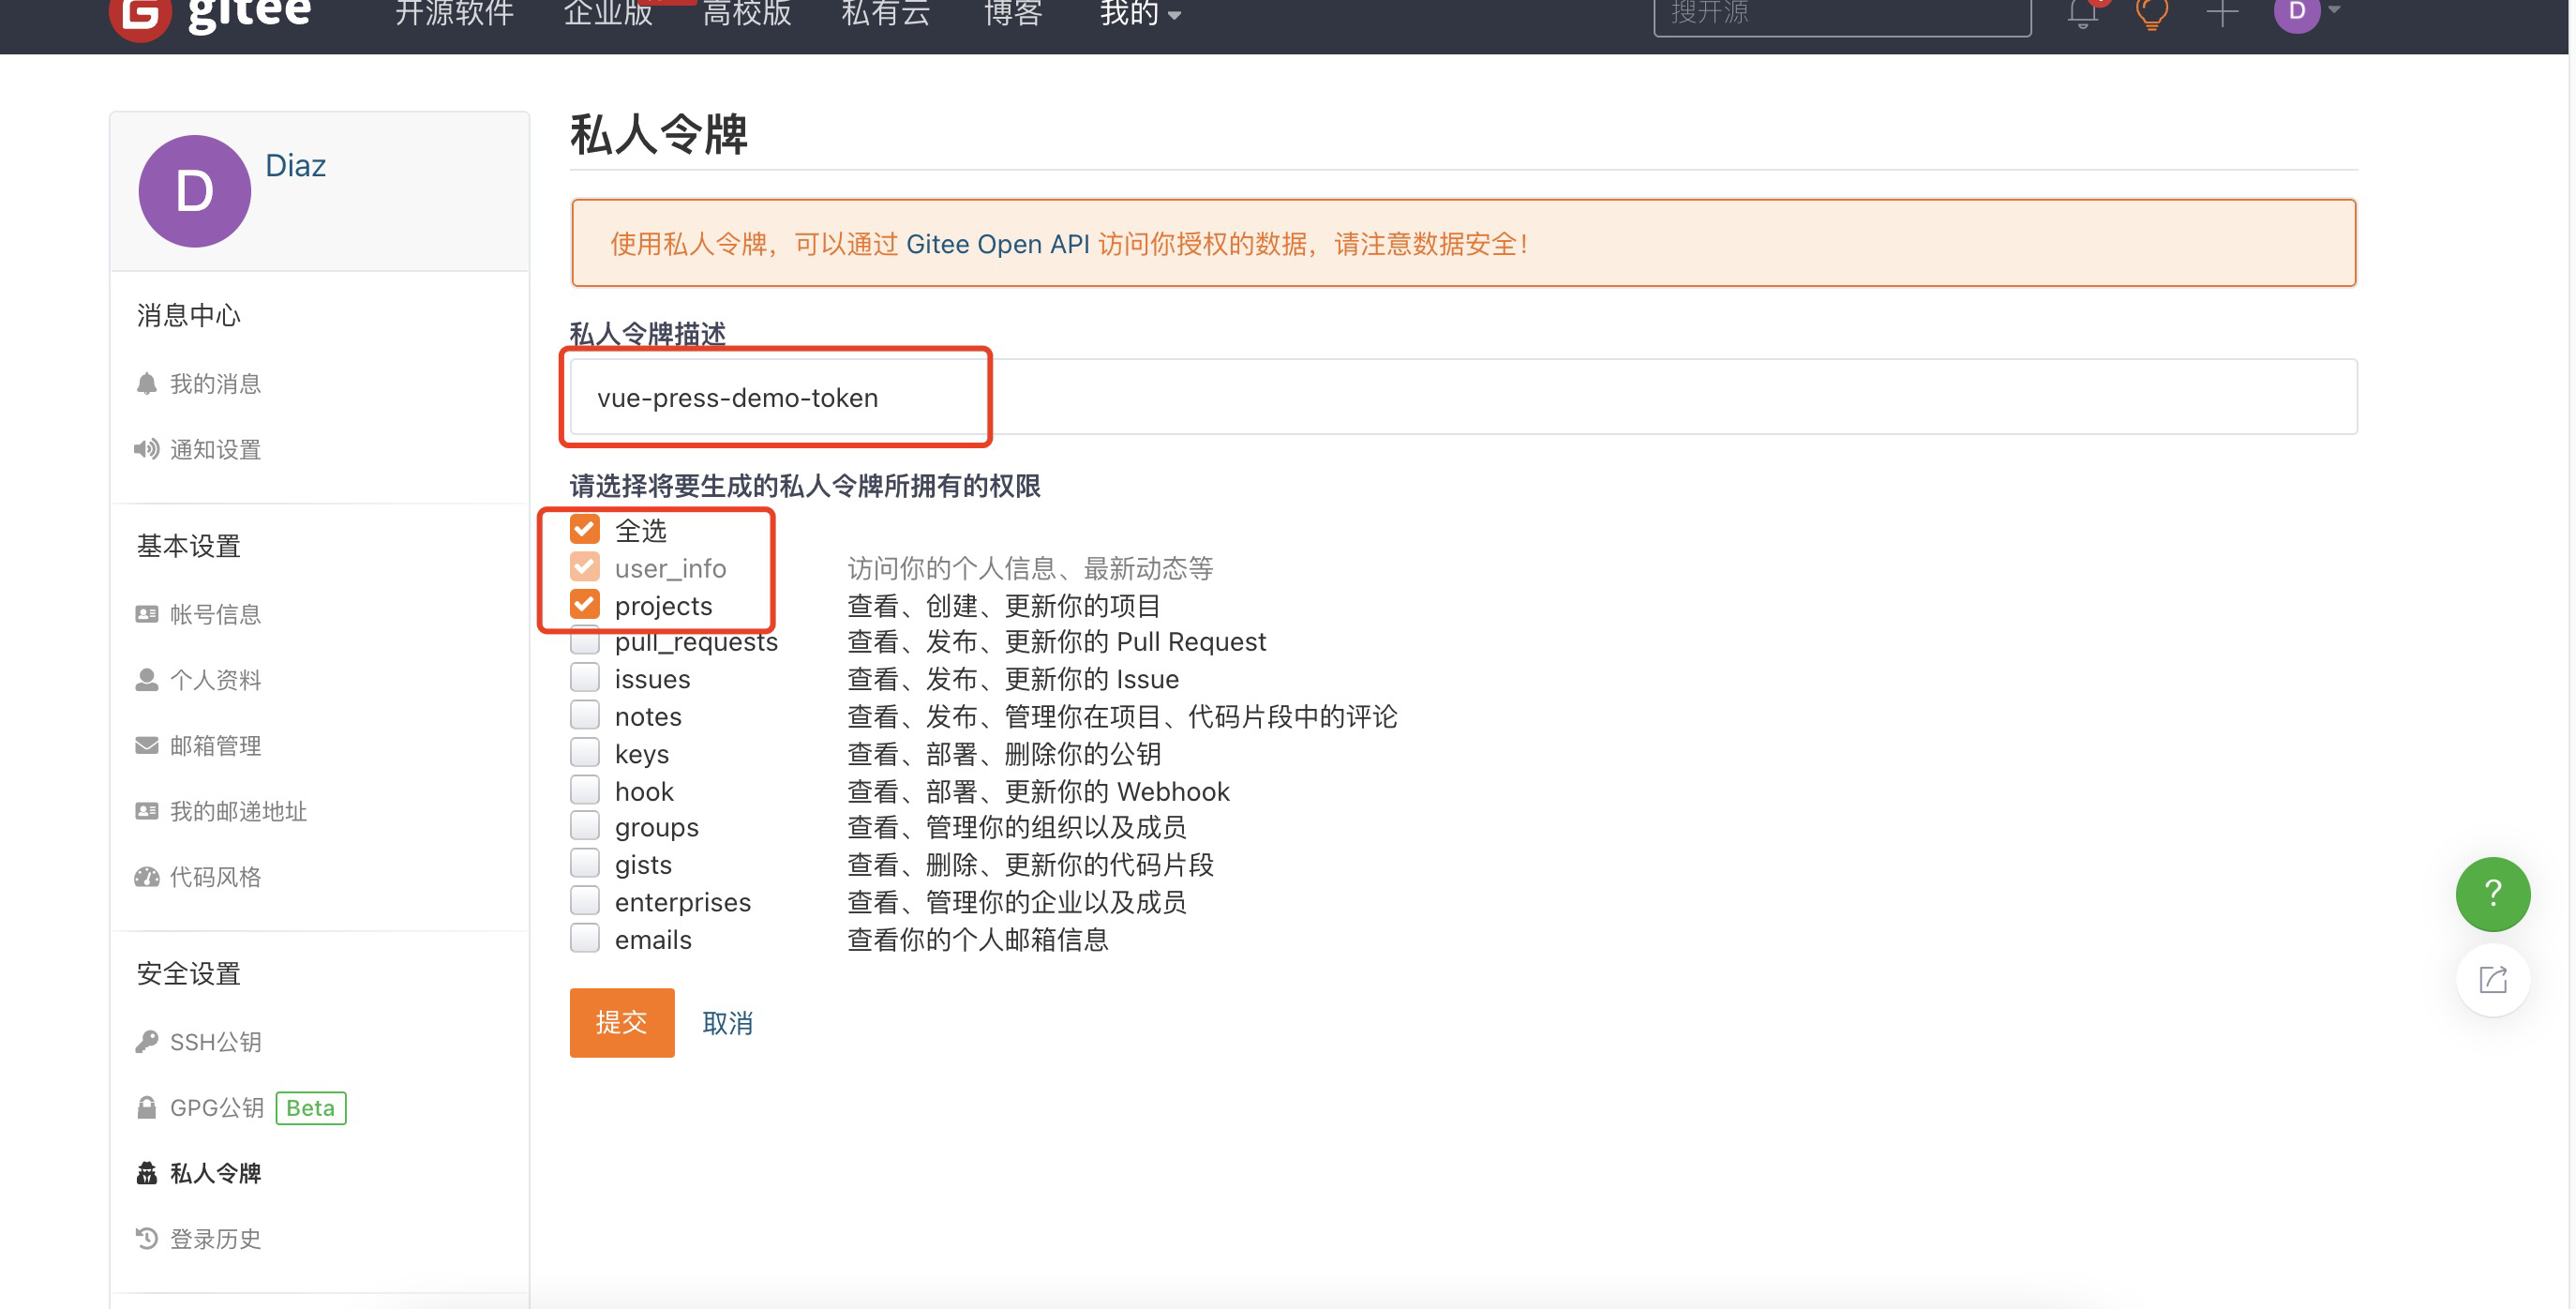
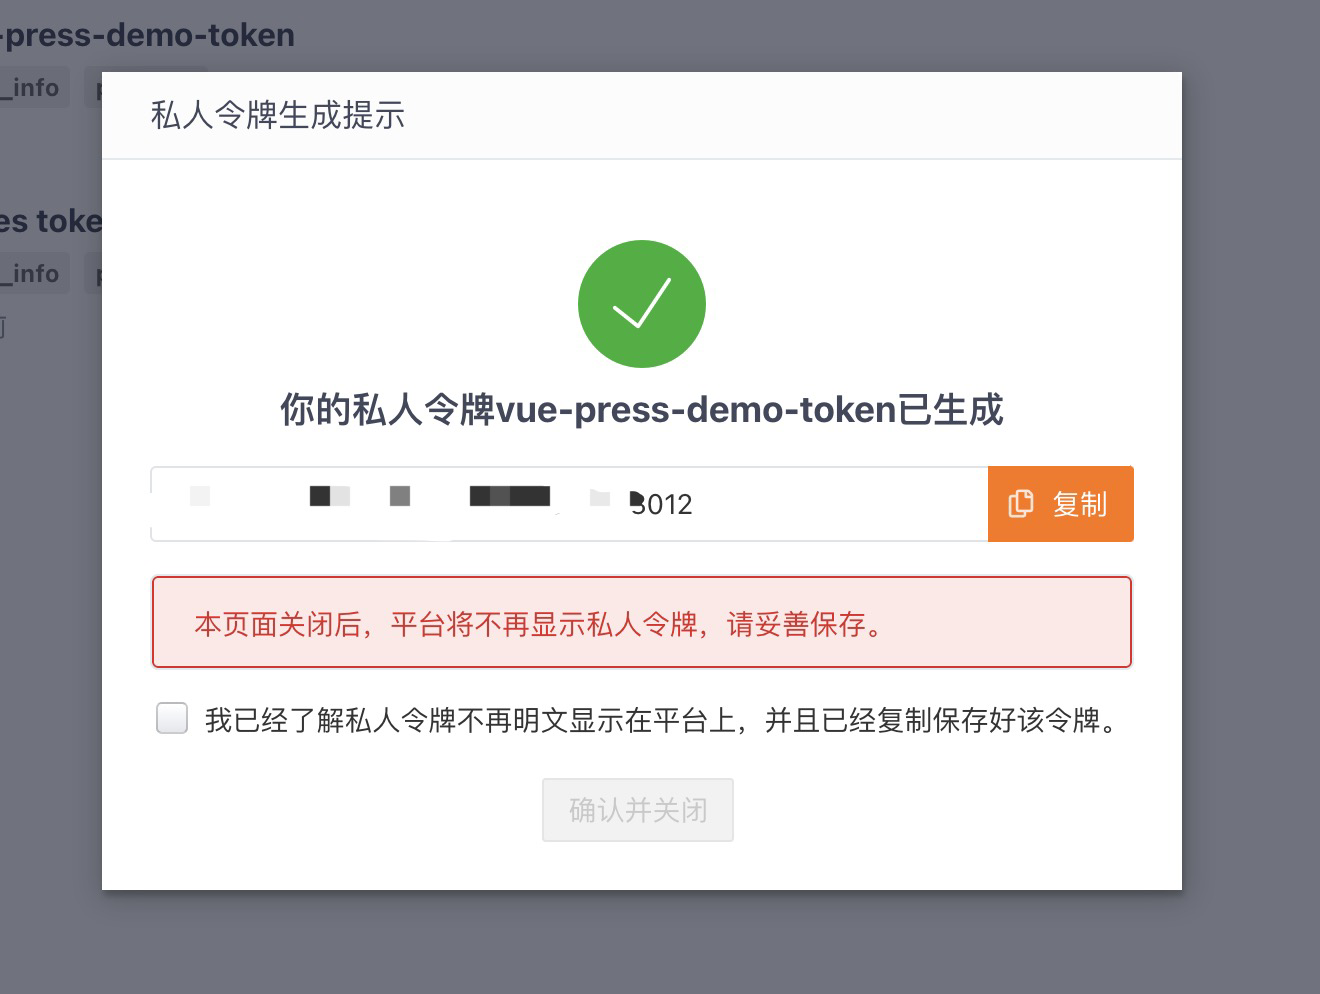
保存好令牌,切记!!!!
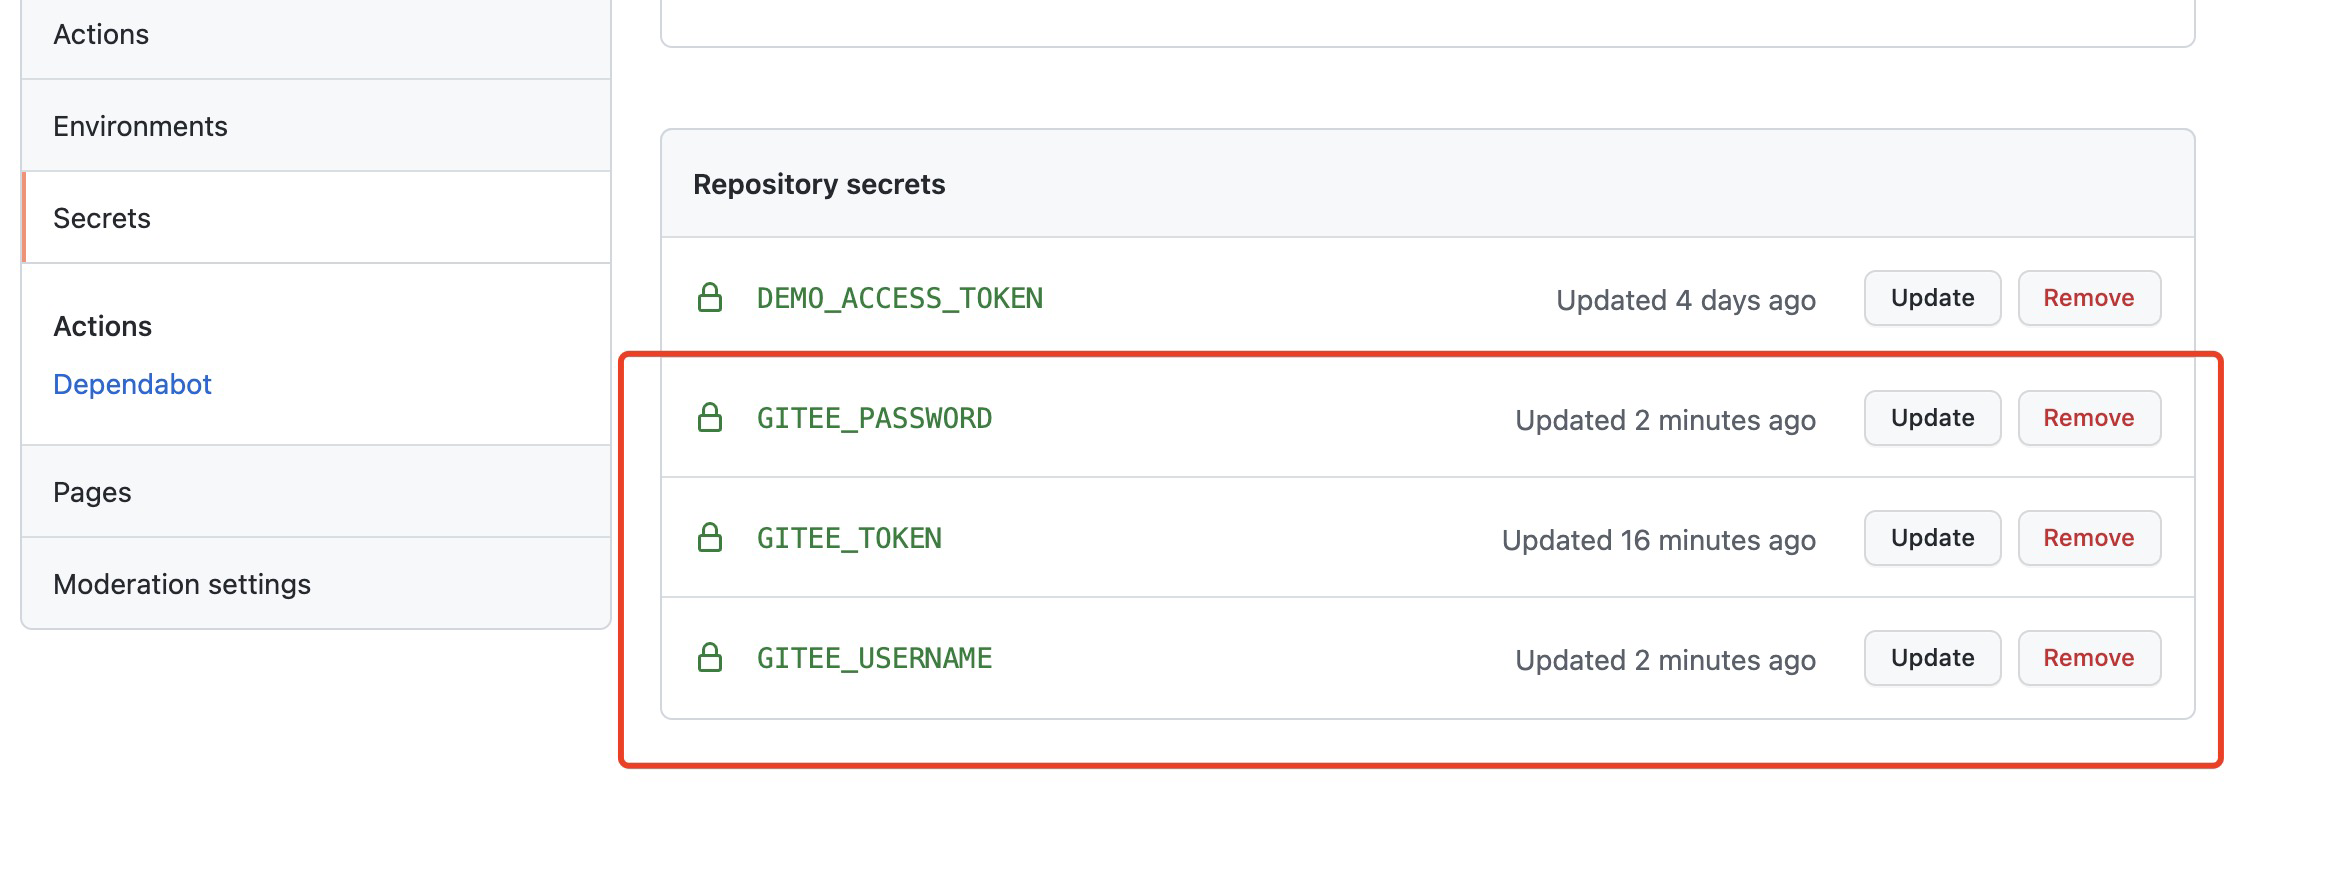
# 将Token及Gitee账号密码到保存到GitHub
保存账号密码是为了使用Action刷新Gitee Pages
# 修改.github/workflows/deploy-site.yml
name: Deploy Site
# 触发条件:当master分支有更改时
on:
  push:
    branches: [ master ]
  pull_request:
    branches: [ master ]

jobs:
  # 部署到GitHub Pages
  build-and-deploy:
    runs-on: ubuntu-latest
    name: "Build and deploy"

    steps:
    - name: Checkout
      uses: actions/checkout@v2

    # 安装依赖并打包
    - name: Install and build
      run: yarn install && yarn docs:build

    # 部署构建物到指定分支
    - name: Deploy 🚀
      uses: JamesIves/github-pages-deploy-action@4.1.5
      with:
        branch: gh-pages
        folder: ./docs/.vuepress/dist
        token: ${{secrets.DEMO_ACCESS_TOKEN}} # Personal Access Token
  # 追加如下内容
  # 推送构建物到Gitee仓库
  push-to-gitee:
    needs: build-and-deploy
    runs-on: ubuntu-latest
    name: "Push to Gitee"
    steps:
     - name: Checkout
       uses: actions/checkout@v2

    # 切换分支到gh-pages
     - name: Switch branch
       run: git fetch --unshallow && git checkout gh-pages && git pull

       # 增加这一步是因为如果直接使用URL推送可能会有shallow update not allowed的错误
     - name: Add remote
       # 替换链接为你自己的Gitee代码库地址
       run: git remote add gitee https://oauth2:${{secrets.GITEE_TOKEN}}@gitee.com/diaz/vue-press-demo.git

     - name: Push to gitee
       run: git push -f --all gitee
       # 如果你只想部署构建物到Gitee就使用如下的配置并在Gitee Pages设置中将Pages分支设置为master
       # run: git push -f gitee gh-pages:master

    # 刷新Gitee Pages(https://github.com/yanglbme/gitee-pages-action)
     - name: Refresh Gitee pages
       uses: yanglbme/gitee-pages-action@main
       with:
        gitee-username: ${{secrets.GITEE_USERNAME}}
        gitee-password: ${{secrets.GITEE_PASSWORD}}
        gitee-repo: diaz/vue-press-demo # 仓库名称
        branch: gh-pages # 存放Pages的分支
        # branch: master # 仅部署构建物时使用
保存并提交代码,然后等待流水线构建
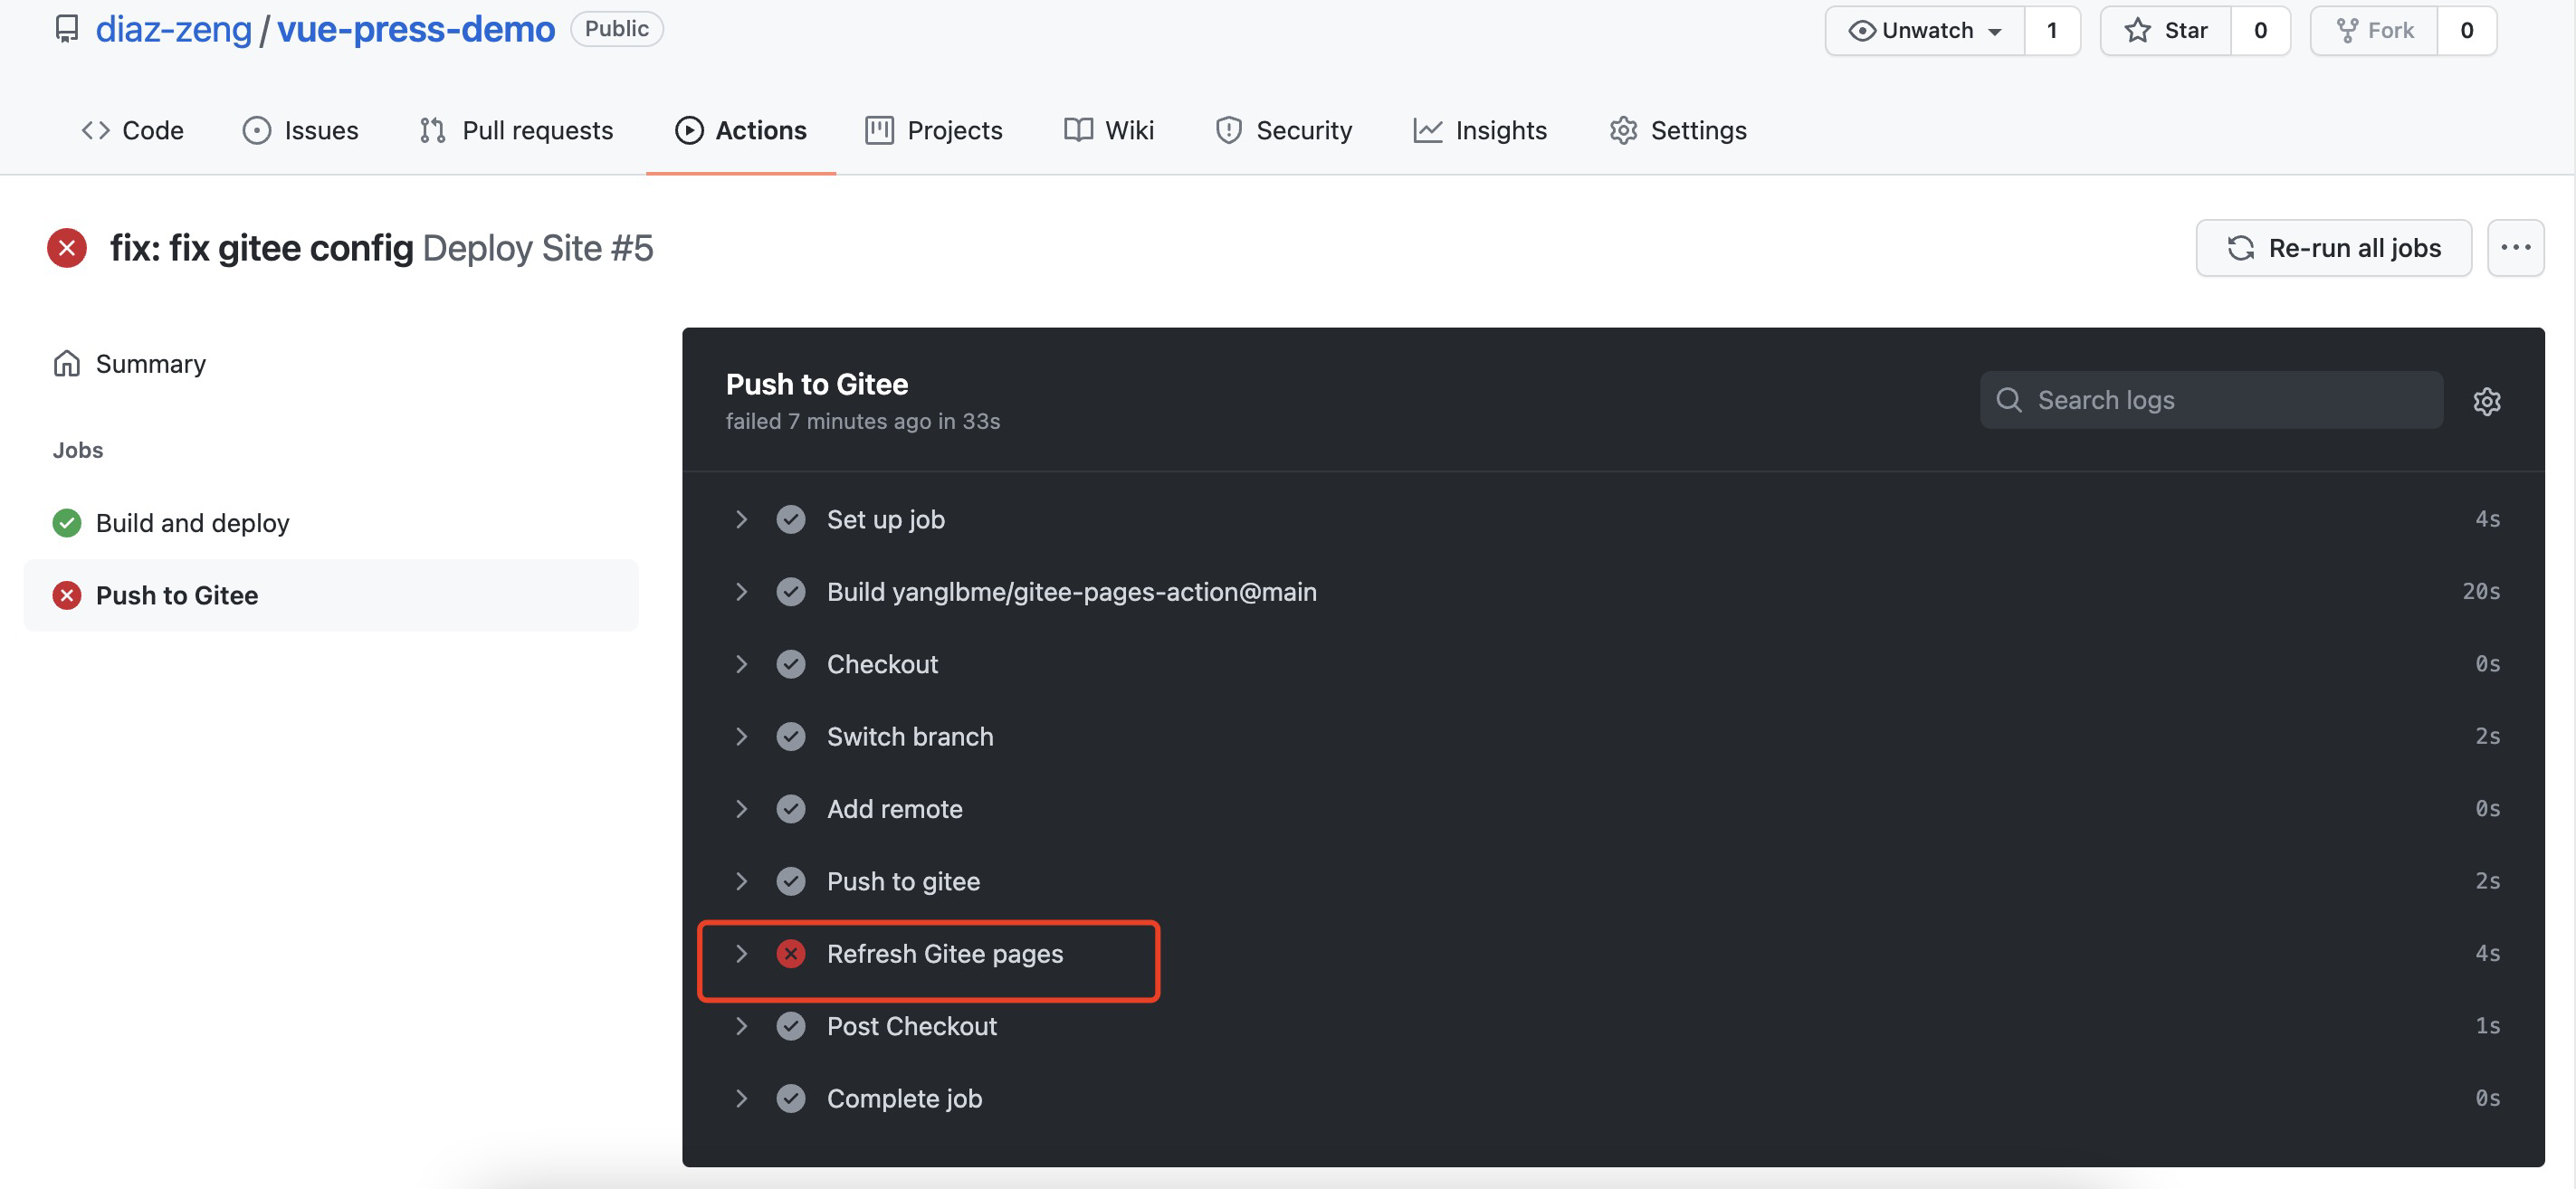
失败了不要慌,这是因为我们还没打开Gitee的Pages服务,空代码库是没有这个选项的,但是现在代码已经推送过去了。
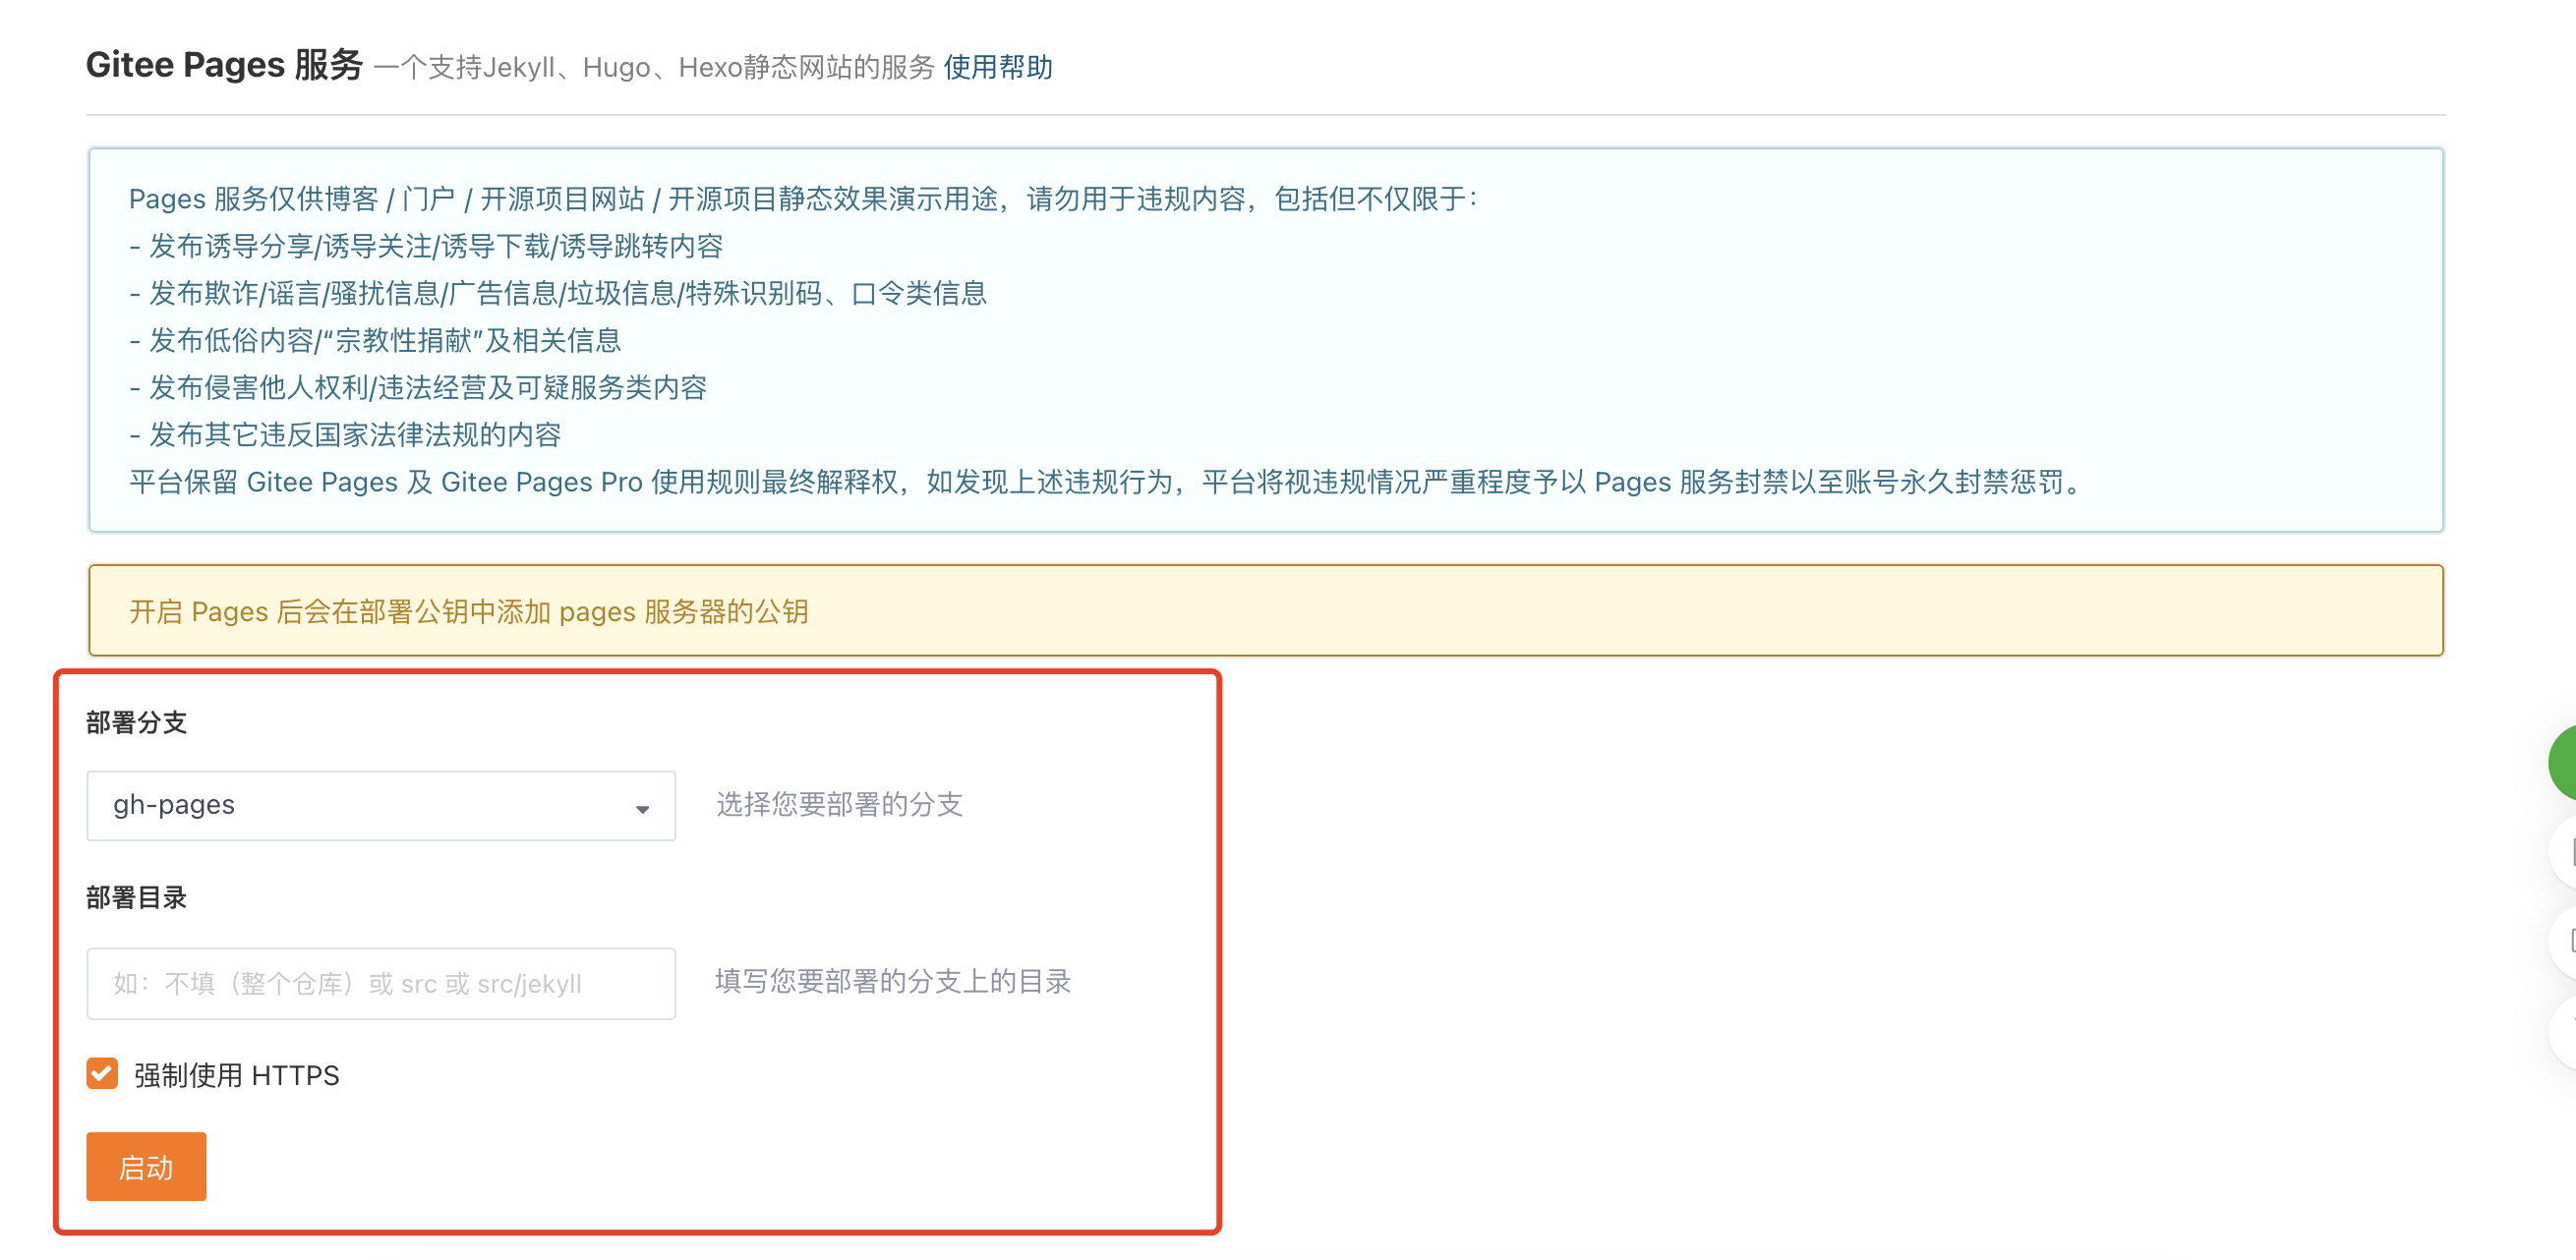
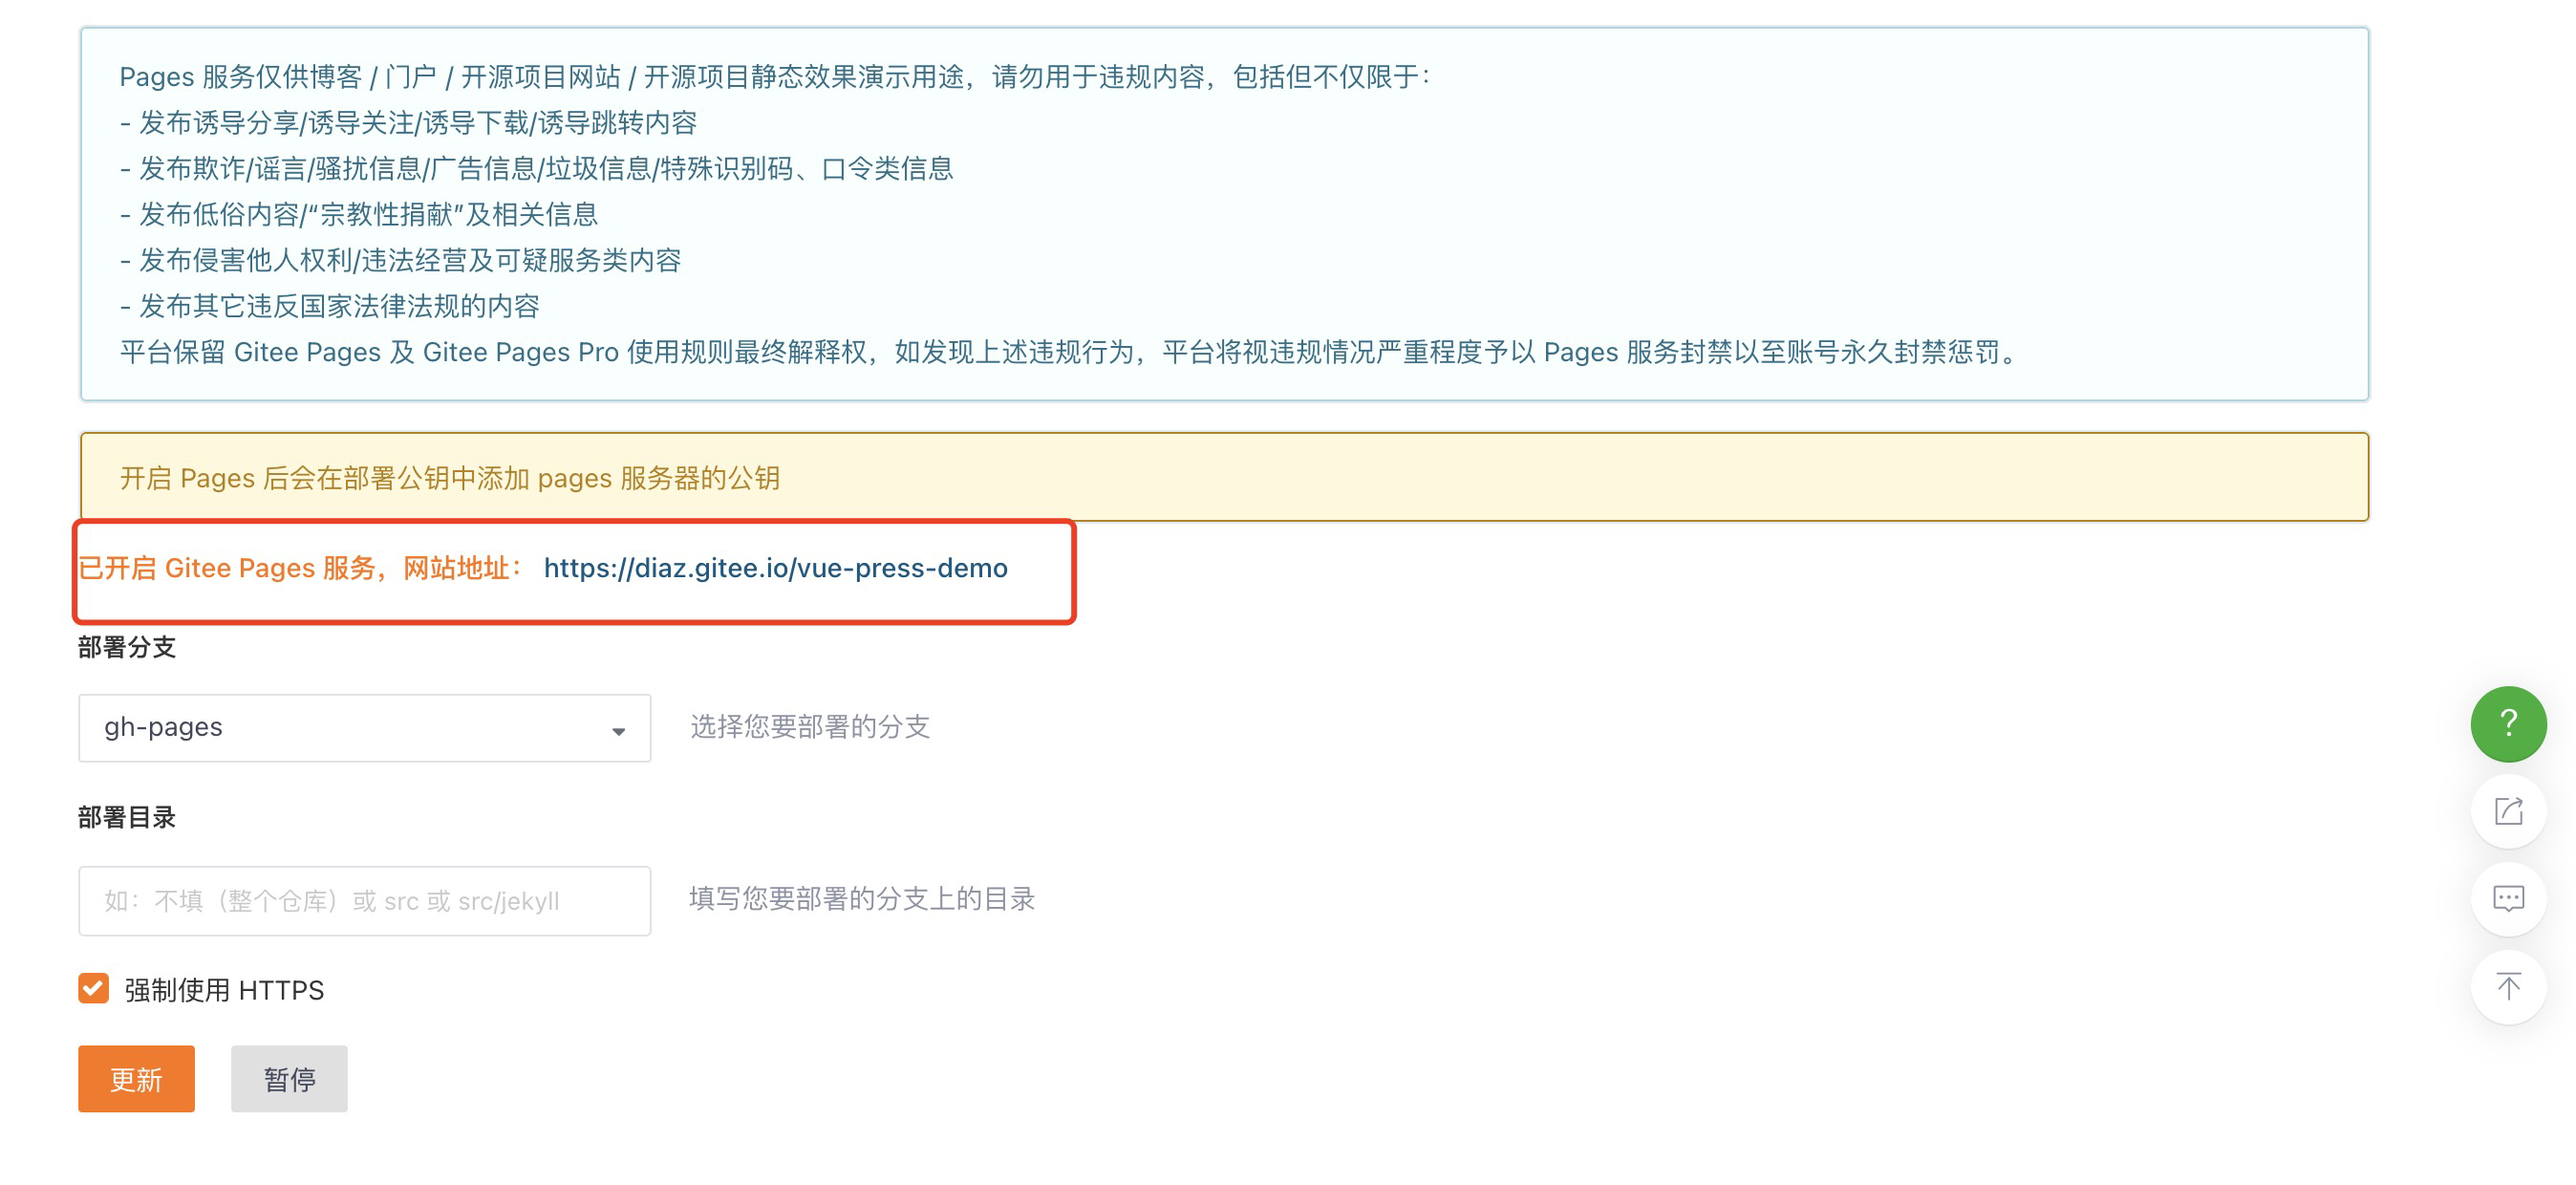
# 打开Gitee Pages服务

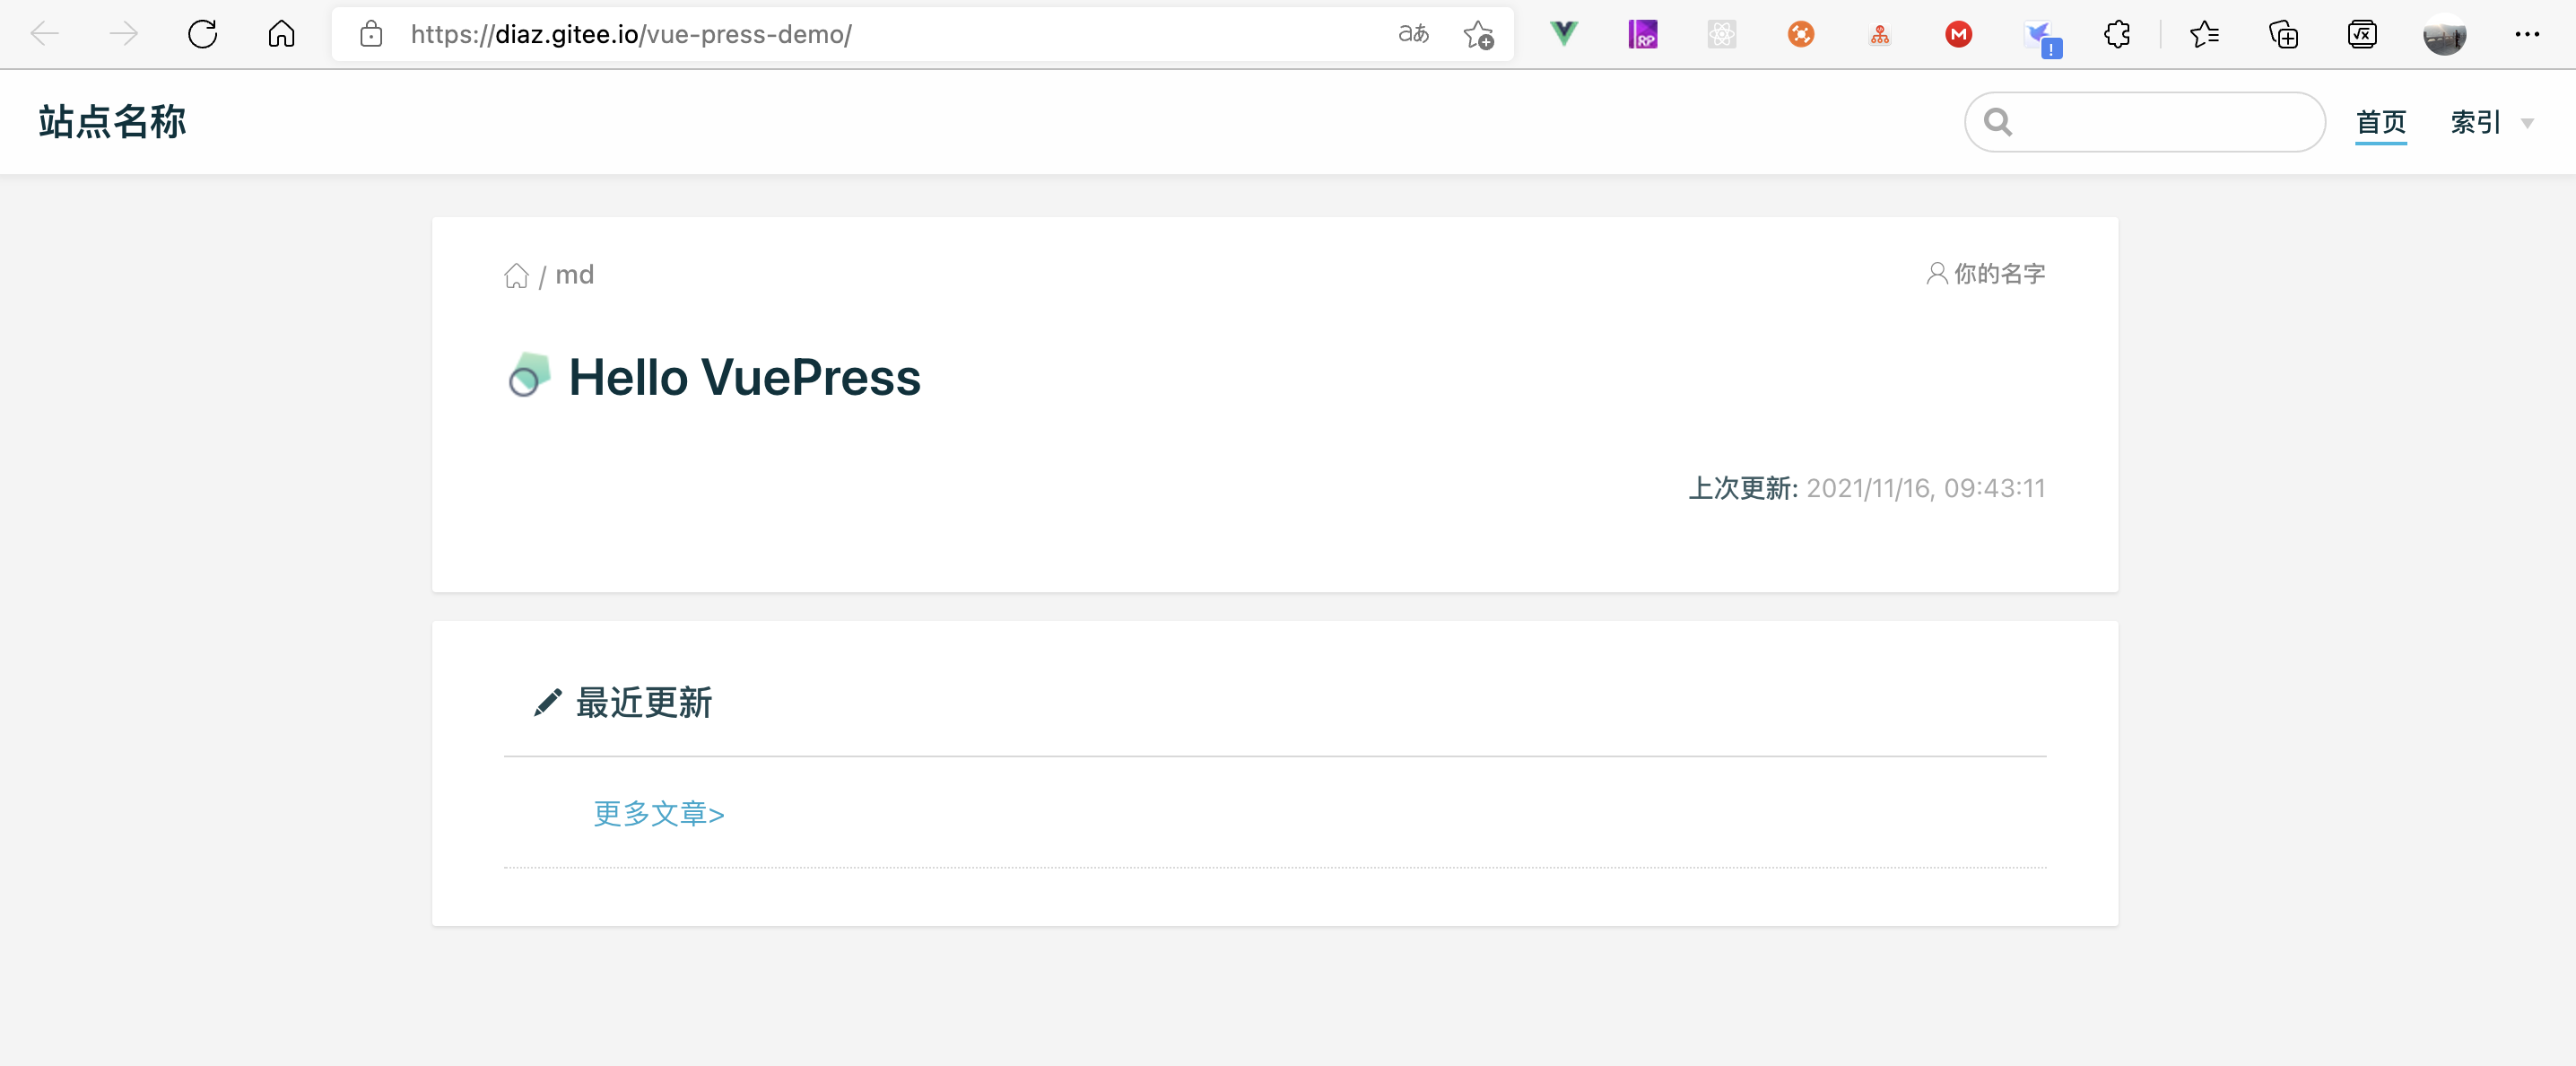
# 测试配置是否正常
访问看一下
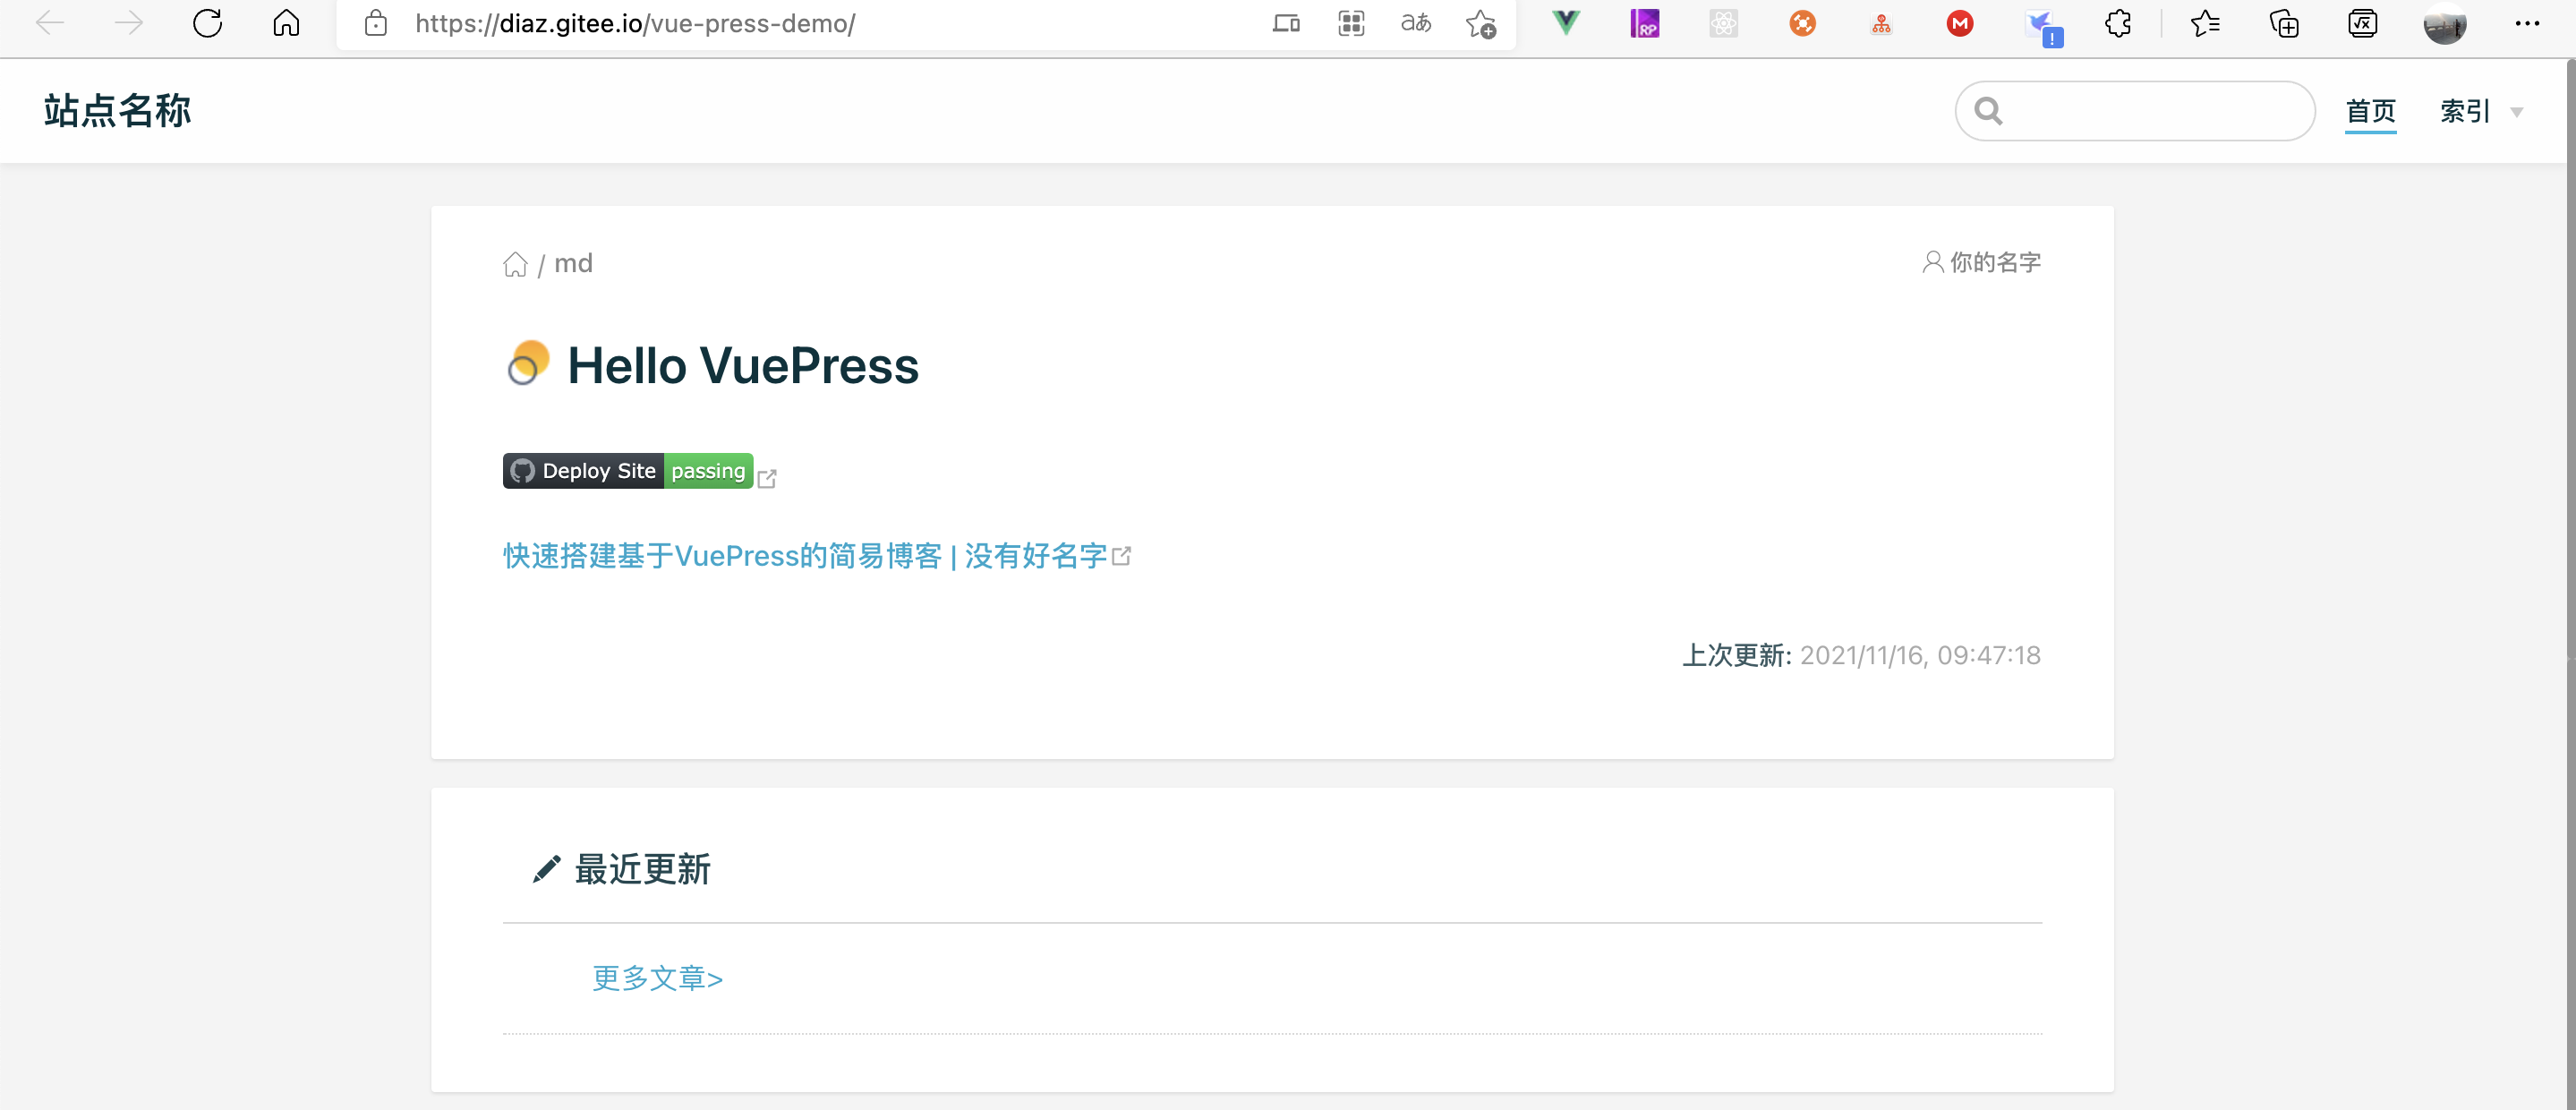
修改一些内容再次提交测试测试一下Action是否正常

内容也已经更新上去了
到此所有的配置都结束了,这个项目我放在GitHub上了diaz-zeng/vue-press-demo: vuepress演示项目 (github.com) (opens new window),有需要的可以参考一下。
# 关于目录结构
首先晒出我的目录结构
.
├── .github   (可选,GitHub Actions所需文件)
│   ├── workflows
│   │   └── deploy-site.yml (可选,包含打包、多渠道部署的配置)
├── docs
│   ├── .vuepress (项目配置目录,同官方:https://vuepress.vuejs.org/zh/guide/directory-structure.html#目录结构)
│   │   └── config.js
│   ├── <结构化目录>
|   └── README.md (index.md也是可以的,但是我选择README,因为也可以被GitHub作为项目文档所识别)
└── package.json
这是我基于vuepress-theme-vdoing 所建议的目录结构 (opens new window)进行简化的,本质上所有的文档只要是放在docs目录下都是可以的,没有硬性的规定,但是我还建议遵循构建结构化站点的核心配置和约定 (opens new window),以方便文档的管理。